Welcome!
 Hey there! I'm Holly. A 40+ year old insurance-nerd wife, mom, beauty lover, and about a million other things in between.
This is the place where I share about our lives, what I'm currently loving, books I'm reading, plus-size style, beauty recommendations, health + fitness endeavors and anything else I'm finding interesting at the moment.
Thanks for stopping by!
Hey there! I'm Holly. A 40+ year old insurance-nerd wife, mom, beauty lover, and about a million other things in between.
This is the place where I share about our lives, what I'm currently loving, books I'm reading, plus-size style, beauty recommendations, health + fitness endeavors and anything else I'm finding interesting at the moment.
Thanks for stopping by!
Category Archives: Recipes
Honey Spiced Chicken Thighs
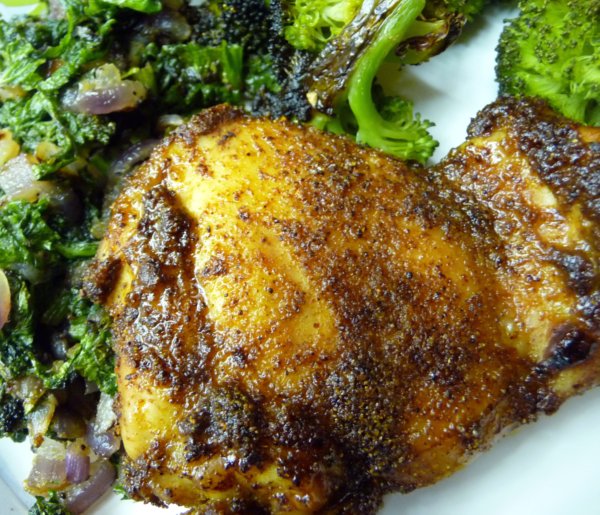
I am on a personal mission to make the world love chicken thighs. Boneless, skinless chicken thighs particularly, so I thought I should get my agenda right out there in the open. If you are even the slightest bit scared to cooked chicken thighs but you are willing to test out something quick and easy, THIS is your recipe. (I’m looking at you Mom and Aunt Louise!) There is little prep and the entire dish comes together in under 20 minutes from fridge to table. Also, your chicken thighs get those crispy little bits that you can get on the grill without having to brave the outdoors and who doesn’t love crispy little bits? I mean, come on.
If you are a lover of chicken thighs (Please, join the club, would you? For the love.) you will enjoy adding this to your arsenal of weeknight recipes, I promise! I adapted it from a Cooking Light recipe and it says something like “Our most popular chicken recipe ever.” EVER, you guys. So you know it has to be pretty good. Serve it along side some sauteed greens (mustard greens, pictured above) or a big salad — HOW GOOD DOES A BIG SALAD SOUND AT THIS TIME OF YEAR??? — and get on to all those other things you need to do after dinner!
Quick. Convenient. Tasty. Chicken.
(All of a sudden I feel like Dale Jr. in those Wrangler ads – Real. Comfortable. Jeans.)
It’s the Wrangler of Chicken Recipes! EAT THEM ALREADY!
Honey Spiced Chicken Thighs
Adapted from Cooking Light
Ingredients
3 teaspoons garlic powder
3 teaspoons chili powder
1 1/2 teaspoons salt
1 1/2 teaspoons ground cumin
1 1/2 teaspoons paprika
1/2-1 teaspoon cayenne pepper (depending on how spicy you like things)
12 skinless, boneless chicken thighs
9 tablespoons honey
3 teaspoons cider vinegar
Method
1. Get your broiler nice and hot!
2. Combine first 6 ingredients (your dry rub) in a large bowl. Add chicken to bowl; toss to coat.
3. Place chicken on a cookie sheet lined with a rack.
4. Broil chicken 5 minutes on each side with your cookie sheet on the high rack in your oven.
5. Combine honey and vinegar in a small bowl, stirring well.
6. Remove chicken from oven; brush half of the honey mixture on chicken. Broil 1 minute.
7. Remove chicken from oven and turn over. Brush chicken with remaining honey mixture. Broil 1 additional minute or until chicken is done.
8. Enjoy!

Ugly Food That Tastes Good: Pizza Zucchini
You know this food, right? It’s so hideously unattractive that even the best food bloggers can’t make it look appetizing, but it’s food that needs to be shared with the world? Well this side dish is right up on that list and since I am not the world’s best photographer, yet this is a recipe I’ve emailed a million times I decided that it was about time to bite the bullet and post it anyway.
Pizza Zucchini AKA How My Mom Got Me To Eat My Vegetables As A Child
It has all the flavors of your favorite late night deep dish, but with the added benefit of being a giant serving of vegetables. This is about as close as I get to supporting the Congressional decision to make pizza a vegetable. This method is so easy a caveman could do it (calling it a recipe is almost too formal) but if you are going strict Paleo, omit the cheese. If not, enjoy the melty goodness!
Pizza Zucchini
Adapted from My Mama
Serves 4
Ingredients
2-4 medium/large Zucchini cut in half (or quartered if really large) and sliced into half moons
1 TBS of your preferred cooking fat
Salt
Pepper
Garlic powder
Penzey’s Pizza Seasoning (A mix of Oregano, Basil, Crushed Red Pepper Flakes, Cayenne)
1 14 oz Can Diced Tomatoes
1 Cup Shredded Cheese (My mom used to use mozzarella, we use whatever is on hand. It’s good either way!)
Method
1. In a 12 inch skillet (one that has a lid) heat up your fat of choice on medium/medium high then toss in chopped zucchini.
2. Brown your chopped zucchini on medium high until crisp tender – a full skillet will take 8-10 minutes depending on the size of the zucchini pieces. Whether they are cooked more or less will be a personal preference in the end. I like mine a little crunchy when it’s done. Garrett likes his soggy. Usually we compromise. At this point, you want the zucchini to have a little color but not be completely cooked.
3. Season with salt, pepper, garlic powder and Penzey’s Pizza Seasoning to taste. (If you don’t have pizza seasoning, substitute Italian Seasoning)
Note: Pizza Seasoning does contain salt so beware of that when you are salting to taste.
4. Add the entire can of tomatoes with their juice and crank up the heat right on the cusp of medium high/high for about another 5 minutes. This will continue to cook the zucchini and also reduce a bit of the tomato liquid.
5. When the tomato liquid has reduced a bit, lower heat back to medium, sprinkle the cheese on the top, cover for 1-2 minutes and let it melt.
6. Serve and smugly enjoy the flavors of pizza with the servings of vegetables!
Brown Butter Pumpkin Muffins with Vanilla Cinnamon Cream Cheese Frosting
Everyone needs a little (grain-free, gluten-free HA!) treat once in a while, yes? Might I recommend these delicious little nuggets of seasonal sustenance if you are committed to clean eating yet still jonesing for a sweet treat?
Amelia shared the original recipe with me, but instead of fussing with a cake, I just decided to fly by the seat of my pants, mix up the batter, bust out my silicone muffin cups (fantastic and cheap kitchen investment!) and call it breakfast.
It was a good decision.

Adapted from Redeeming the Table
Makes 12 Muffins
Ingredients
For the cake:
½ cup unsalted butter, grass-fed, more for pans
12 oz (3 cups) blanched almond flour
1 1/2 tsp baking soda
1 1/2 tsp ground cinnamon
1 tsp ground ginger
3/4 tsp ground nutmeg
3/4 tsp sea salt
1/4 tsp ground cloves
½ cup honey
3 large eggs, room temperature
1 1/2 cups pumpkin puree
For the Honey-Cinnamon Frosting:
¼ cup unsalted grass-fed butter
8 oz cream cheese, room temperature
½ cup honey
2 tsp ground cinnamon
1 tsp vanilla
Method
1. Preheat oven to 350 degrees
2. Melt the butter in a 1 quart heavy bottomed pan, stirring occasionally until the butter turns a nutty golden-brown (around 4-6 minutes).
The browned butter will have three parts to it. The bubbly part on the top, the golden brown clarified butter/ghee, & the burnt milk solids at the bottom. Scrap off the bubbles & discard. Pour the golden brown ghee/clarified butter into a pyrex style measuring cup, and try to keep the browned bits out.
Set aside & allow it to cool.
3. In a large bowl, add all of your dry ingredients and whisk them together (almond flour, spices, salt, & baking soda).
In a medium bowl, combine honey, eggs, & pumpkin puree & whisk thoroughly to combine. Add the browned butter to the wet ingredients to incorporate all the way.
With a rubber spatula, stir in the wet ingredients into the dry ingredients until thoroughly combined & fully incorporated.
4. Ladle into muffin cups. They will be pretty darn full. Batter will rise a bit but not a ton, so it’s okay. Bake for 30-40 minutes or until a toothpick comes out clean. Your nose will know, it’s a pretty aromatic recipe.
5. Make the frosting! Take your room temperature butter & cream cheese & beat them with a hand mixer on medium-high speed. Add your honey, cinnamon and vanilla to the mixture and whip until smooth. Taste and adjust as desired.
6. Frost and Enjoy! I like to frost mine when the muffins are still warm as the frosting gets a little melty. Then pour yourself a cup of coffee and enjoy your little treat!
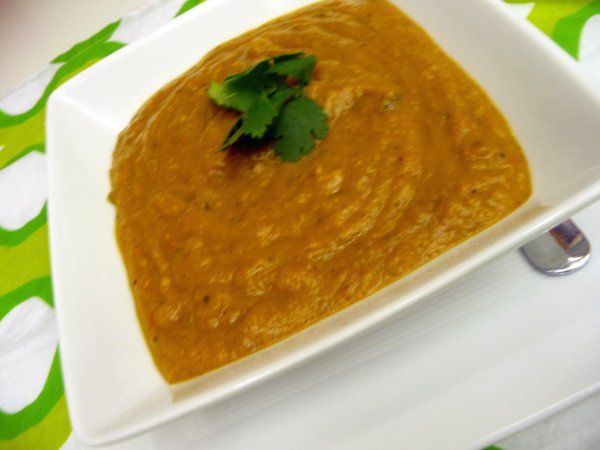
Roasted Butternut Squash Coconut Curry Soup
I don’t know about you, but I tend to make the same soups over and over come fall. This year as a part of my Autumn Bucket List I wanted to spice things up a bit — literally and figuratively — by trying my hand at making 5 New Soups! I’m getting dangerously close to the end of fall so I thought I better get crackin’!
This is a pureed soup and I have to admit, I am not always a fan of pureed soup. Something about not having chunks of meat and vegetables makes me feel like it isn’t as hearty as soup should be, but I promise, the coconut milk in this makes it incredibly hearty. You could definitely make this as a meal for two hungry people or serve it in small portions as a fancy pre-meal course.
It is SO YUMMY!
Soup No. One: Roasted Butternut Squash Coconut Curry Soup
Adapted From this recipe but with many changes because I’m stubborn like that
Serves 4
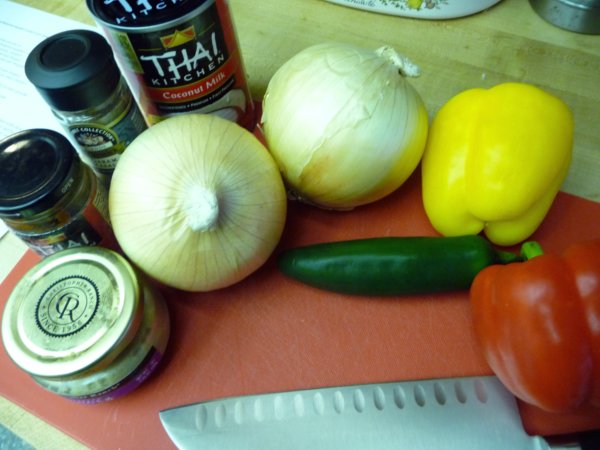
Ingredients
2 TBS Extra Virgin Olive Oil
16 oz Butternut Squash (I bought mine pre chopped at Costco, otherwise about 2 med whole squash)
2 Large Yellow Onions, chopped
1 large red/yellow pepper, or 2 small peppers
2 Jalapenos, diced with ribs and seeds removed
4 garlic cloves, diced
2 heaping tsp ginger
1 TBS coconut aminos (or liquid aminos/tamari/soy sauce)
1 TBS red curry paste
2 tsp Garam Masala
1 14 oz can Coconut Milk
2 Cups Chicken Stock
Salt and Pepper to Taste
Cilantro for garnish
Method:
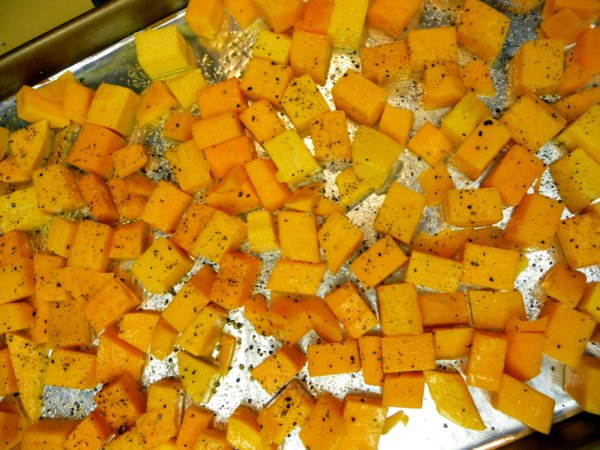
1. Roast cubed squash at 375 degrees for 45 minutes (in a single layer on a foil lined sheet pan) tossed with Extra virgin olive oil, salt at pepper.
2. When squash is halfway done roasting, get started with the base of your soup. In large heavy bottomed pot heat up extra virgin olive oil at medium heat. Add in onions, and ginger and saute until onions are translucent (about 8-10 minutes). Season with salt and pepper.
3. Add in red pepper(s)and jalapenos and saute for another 10 minutes. Season again as you go. This will ensure great flavor through every layer of your soup.
4. Lastly add the garlic and saute for one minute, ensuring it doesn’t burn.
5. Add in aminos, red curry paste and garam masala and stir to coat. Then add can of coconut milk, chicken stock and your butternut squash cubes.
6. Bring to a boil and then lower heat so soup simmers about 30 minutes.
7. Puree your soup in an immersion blender, or in small batches in the regular blender. Check for seasoning and amend if necessary.
8. Garnish with cilantro and Enjoy!
Grilled Maple Mustard Chicken Thighs
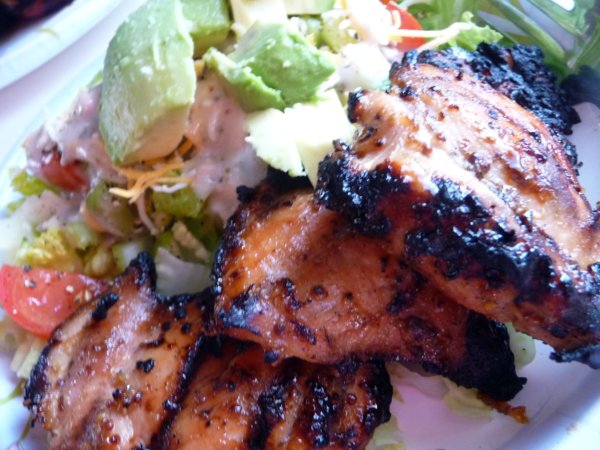
Yep, it tastes as good as it looks! Even on a paper plate! (Food Blogging Fail…BAHAHAHAH!)
I mentioned on this week and last week’s menu a little recipe for Maple Mustard Chicken Thighs and you all — IT IS A KEEPER!
I’m a super fan of marinades that you can easily make on hand with ingredients you normally have lying around. I’m also a fan of marinades that are man pleasing and delicious. This one satisfies all of the above.
I used chicken thighs because I am having a love affair with them. Have you enjoyed chicken thighs lately? I always thought they were kind of slimy and gross looking, but then I realized — oh wait, that’s ALL CHICKEN! But chicken thighs have the added benefit of holding up wonderfully on the grill because they are so juicy! The outside gets nice and crispy, while the inside stays completely delicious and doesn’t dry out. They are worth trying in this marinade if you haven’t! That said, it would also go lovely with chicken breasts, so never fear if you aren’t feeling adventurous.
Chicken thighs as an adventure? My life is really a Thrill-A-Minute ain’t it?
So I took the original recipe and changed a few things to make it slightly more Paleo friendly (substitutes for refined sugar and tweaked the mustards due to what I had on hand) but the truth is this recipe is a bit of a sweet treat. But the other truth is — it is AWESOME! So use that information for good or for evil!
I love this recipe is best on the grill, but it would also be enjoyable cooked in a pan or baked. I have done both and it’s quite adaptable. Also, it is November, so you know — choose the cooking method that best works for your weather situation!
*****
Maple Mustard Chicken Thighs
Adapted from Cooking Light
Ingredients
9-10 Boneless Skinless Chicken Thighs (or 4 Breasts)
1/3 Cup of Stone Ground Mustard
3 TBS Honey
3 TBS Maple Syrup
3 TBS Yellow Mustard
1/4 Onion, grated
1 TBS Apple Cider Vinegar
2 tsp Coconut Aminos (or Soy Sauce if you use that)
1 tsp black pepper
Method
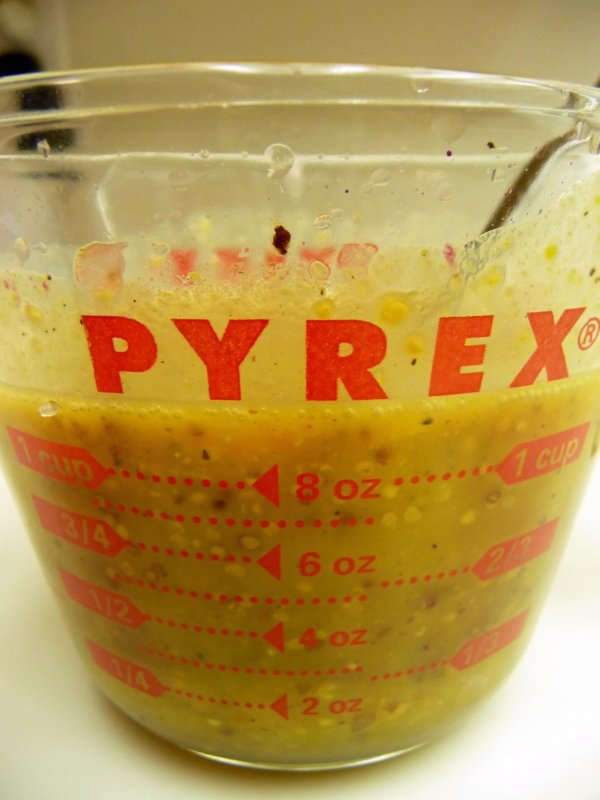
1. Mix up all those ingredients in a little Pyrex. It won’t look glamorous, but it will be good.
2. Marinate your chicken for 2-12 hours. (I’ve even done it the night before I grilled and left it in the fridge. Lazy man marinating!)
3. Before you grill (AND THIS IS IMPORTANT) season your chicken with salt. I used probably about 1/2-1 tsp.
4. Grill! (or pan fry, or bake!)
When I grill chicken thighs I generally do it over fairly high heat and do 5 mins with the grill open, 3-5 minutes closed, flip and 5 minutes with the grill open. Depending on the size and thickness of your thighs you may need additional time, but this works pretty flawlessly.
Oh, I forgot Step 5
5. EAT THEM WITH EVERYTHING! Vegetables, salads, cold out of the fridge — it’s all delicious baby!
Broccoli, Bacon and Apple Salad with Warm Bacon Vinaigrette
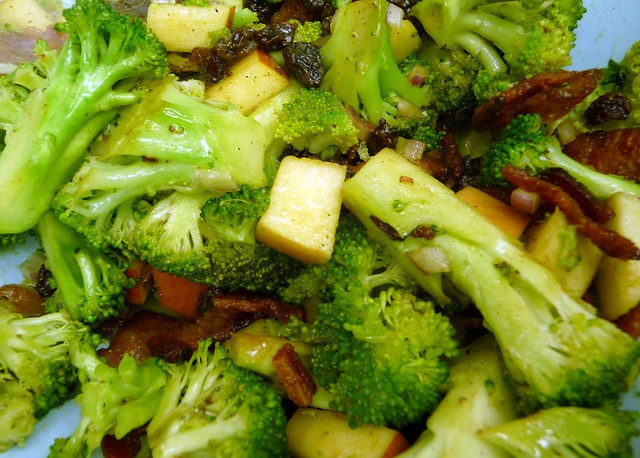
This is one of those recipes where the deliciousness of the actual end product is directly proportional to how unattractive the photos are. What I’m saying is his salad is kind of an ugly duckling. Don’t hate on her though, she’ll grow up to be a swan right about the time you scoop a little bit out onto your plate.
I had this salad at multiple CrossFit potlucks (it’s very Paleo Friendly) and finally decided I needed to figure out how to make it. Luckily there are recipes all over the internet, so I reviewed many of them to verify ingredients and then (as usual) eyeballed my own mixture (and used my own Warm Bacon Vinaigrette, which is THE BOMB, if I do say so myself!)
Try it out! It’s an easy, cruciferous side dish that is a little more exciting than your average salad.
Broccoli, Bacon and Apple Salad
Serves 4 as a side (or Two Broccoli Loving Adults)
Salad Ingredients:
2 small heads of broccoli, chopped
1/2 small red onion, finely diced
1 apple chopped (I like Gala or Fuji or similarly sweet apples)
1/2 cup raisins
8 slices of bacon, diced
Warm Bacon Vinaigrette
Dressing Ingredients:
2-4 TBS of Hot Bacon Renderings
1 Shallot, finely diced
1 TBS Apple Cider Vinegar
1 tsp Dijon Mustard
Salt + Pepper to taste
Method:
1. Cook diced bacon over medium heat until browned. Err on the side of a little undercooked because they will be sitting and doing some carryover cooking while you assemble.
2. While bacon is cooking, add all other salad ingredients into a medium sized bowl and stir to combine.
3. Drain bacon renderings from pan leaving only about 2 to 4 TBS left in the pan. Add diced shallot and cook until softened about 2-3 minutes.
4. Remove from heat. Add dijon mustar, vinegar and salt/pepper. Stir to combine.
5. Pour desired amount onto salad and toss. If you have an leftovers, throw in a glass jar in your fridge. To use again, just put glass jar in a pot of warm water on the stove and let warm up again.
6. Enjoy!
*******
I really think the dressing makes this salad. Oh, who am I kidding — the bacon too! This dressing is versatile and delicious, it is my go-to for Spinach Salads with lots of chopped hard boiled eggs and takes LITERALLY a few minutes to assemble and packs a punch of flavor.
I hope you love it!
Easy Paleo Turkey Satay Burgers

I’m just going to throw this out there: Satay sauce is next to Godliness in my humble opinion.
It’s creamy, nutty and sometimes spicy — and really what more can you want from a sauce? Just typing that made my mouth water. The only two problems I have with it? The peanuts make it very un-Paleo (Peanuts are a legume and not actually a nut…who knew?) and there is generally some type of soy sauce in it which I avoid like the plague (mostly due to gluten). So while I occasionally throw caution to the wind and order if I am out, I wanted to make a version that I could eat anytime and know I wasn’t deviating from the style of eating that has kept me happy and healthy over the last year.
I set out to make a sauce that would hit all the same notes as a good peanut satay (and would be a nice dipper for chicken) but also because I am lazy on most weeknights (shocker!) I wanted to find a way to turn it into a burger. Burgers = King of Easy Weeknight Recipes! Everybody knows (said in my best Phaedra impersonation) that if you are looking for a good burger recipe, Rachael Ray is a great resource. She’s written something like 1000 burger recipes so whenever I’m in a pickle I seek out one of her recipes. This time I used this recipe as inspiration (and did some tweaking to satisfy my own dietary needs.)
The results were PHENOMENAL. I have to admit this surprised me a little. I thought for sure it would be edible, but I wasn’t certain I would love it. I only had turkey on hand and I thought it might be a weird combination, but it actually works out awesome because the creaminess of the sauce lends well to turkey because and its low fat content. The toppings give a great texture combo and overall I LOVED IT! I hope you will too.
Paleo Turkey Satay Burgers (adapted from Rachael Ray Magazine)
Ingredients
for burgers
Fat of Choice (I used coconut oil on this one)
1.25 lbs of Ground Turkey
2 Large Garlic Cloves, grated
1 Inch Ginger Root, grated
3 Green Onions, finely diced
Salt + Pepper to taste (I went lighter on the salt than usual due to the salty sauce.)
for sauce
1/2 Cup Almond Butter
3 TBS Coconut Aminos/Tamari
1/2 Cup Chicken Broth to thin out sauce
1 tsp red pepper flakes (less if you don’t want your sauce to have some kick)
for garnish
1 Bag of Broccoli Slaw (My favorite thing to have in the fridge! So useful!)
Instructions
1. Heat fat of choice over medium in a 12 in skillet (or you could grill these — I just chose a pan because I’m lazy, remember?)
2. In a medium sized bowl, mix all ingredients through salt and pepper. Form into 4 patties.
3. Cook patties for 6 minutes one side, flip, cook 3 minutes on the other side so that the surface gets brown, then cover and continue cooking until inside is desired temperature. I like my turkey fairly well done so I cooked it another 5 minutes covered.
4. When turkey is almost done cooking, in another small pot, combine almond butter and coconut aminos over medium low heat. Stir until combined and then add chicken broth little by little until sauce has desired creamy consistency
5. In a separate bowl toss broccoli slaw with a few TBS of satay sauce
6. Serve cooked burgers on butter lettuce garnished with a dollop of the satay sauce as well as the sauced broccoli slaw
7. Enjoy your super rich, spicy Paleo-friendly satay dish!
The flavor is so complex considering the ingredients are so simple and it has become a great way to fancy up your everyday turkey burger. If you end up trying this let me know how you like it!
____________________
Grilled Salad
The first time I ever heard of anyone grilling lettuce was on a Food Network episode that involved The Neelys. Grilling Salad? I was pretty sure they were smoking more than just the pork butt in their BBQ Restaurants. But I did bookmark it in my brain as something to try at another time, and one night — feeling kind of lazy about the idea of chopping up a million ingredients — I tried it; and lo! The Lazyman’s Salad was discovered.
Grilled Romaine, specifically, is one of my favorite creative ways to enjoy a vegetables when cooking out. There is a bit of showstopping appeal when you put a head of lettuce on a BBQ, and who doesn’t love a little showstopping now and again? You can thank me later for not embedding the video for that similarly titled awful Danity Kane song in this post. If I promise you one thing, I promise you that this recipe is better than entire Danity Kane oeuvre (and a Rainbow Cadillac, whatever the hell that means!)
(P. Diddy is such a linguistic visionary.)

So back to the salad! Even though I have only ever grilled with romaine, I am going to assert that it is the perfect Grillin’ Lettuce. (I believe that’s what’s called Begging the Question. Miriel, please school me on this.) Idiom debates aside, the only preparation that a head of romaine needs is to be sliced in half, keeping the core in tact, and brushed with a bit of Olive Oil, Salt + Pepper. (You can brush oil on both sides, but I find that it is really only necessary on the inside) If you want to get really nutty, you could add other dried herbs at this point too.
In the meantime, light your grill and let’s get that sucker going on a relatively high heat. While you are waiting for it to heat up, let’s talk toppings, shall we?
This is a salad, so toppings are really up to you. Ok, that was a good talk.
Just kidding. This is where you can customize to meet any of your dietary needs. Paleo friends, for example — cut the cheese. You know, um literally. For the sake of demonstration, today I want to talk about Grilled Cobb-Esque Salad, because really…why not? It’s a salad full of bacon and stuff and well, I tend to agree with this sentiment:

Found on pinterest. Thank god there is now a website where I can find blurry, terrible pictures of signs about bacon. THANK GOD.
So while taking a break from pinning arbitrary pictures, and waiting for my grill to heat, I chopped up some Avocado, Tomatoes, Blue Cheese (actually Costco chopped that up, Thanks Costco!), Red Onions, and a Hard Boiled Egg. I also grabbed a stash of bacon bits from my fridge that I pre-cooked over the weekend. What? You don’t have bacon bits in a tupperware in your fridge? GET WITH THE PROGRAM AND GET YOURSELF SOME, they will not go to waste! Well unless of course you are a vegetarian. Then don’t do it. That would be weird.

So we are now about to reach the hardest part of this recipe, but I assure you it is all mental. We are going to — wait for it — put the lettuce on the grill. I know, you never saw that coming, did you?
Your brain will say no, but I promise your tummy will say yes! Just try it!

I know. It kind of makes you want to shake your head. Have faith. Have I steered you wrong yet?
So you will be standing at the grill watching all of this go down and wondering what I’ve been smoking (been there) for about 5-6 minutes. Then your heart will do a little flip. Well not your heart, the romaine heart. And actually, you will be doing the flipping. See what I did there? That’s what’s called lame comedic wordplay.
Thank you! I’ll be here all day.
Then, Behold! Grilled Lettuce! Could you die? Wait, don’t die. The ending will totally worth it and this is not the end. This is the part in an episode of Law & Order where they bring the first and most obvious suspect in and arrest him, even though there is like, 30 minutes left in the episode so it can’t possibly already be solved.

So you will want to go ahead and leave it on for another minute or two just to get everything a bit tender. The thing about this lettuce is that it doesn’t get all wilty and gross, which — isn’t that what you think when you think about hot lettuce? But it is the furthest thing from that, I swear. It’s crunchy, tender, and full of flavor — and that’s even before you add the toppings.
Ah yes, back to the toppings.
So when you pull that shrimp off the barbie and put it on the plate, make sure to dress it before you add the toppings. Let all of that dressing deliciousness seep into the nooks and crannies of the lettuce so that every bite is full of flavor. For my Cobb-esque Salad I used a blue cheese vinaigrette. I could bathe in blue cheese vinaigrette, but you can feel free to pick your own favorite salad dressing.
I’m open minded like that.
Then, let’s add our toppings. Feel free to pretend you are a food stylist while you do this, but just for the sake of full disclosure, these salads taste the best when they look like your produce drawer threw up. It’s not always a pretty dish, but is ALWAYS delivers on the tastiness.

I think P. Diddy would approve!
Although I chose to put a lot of toppings on this particular incarnation of a Bad Ass Salad, I have also made it really simply with only lettuce + tomatoes or lettuce and thinly sliced red onion — really it works with whatever you have on hand. It’s an exciting texture experience, plus all you have to do is cut your lettuce in half. I mean people presume it to be fancy and high maintenance but it’s just lazy and easy masquerading as awesome!
It is the Ke$ha of the salad world, people.
So go forth! Grill Your Lettuce!
And when you do, tell me know how you like it, would ya?
__________________________
6 Easy Steps to A Fabulous Frittata

Hello, lover
It has been a bit of a Frittata Frenzy around my house lately, and frankly I am wondering why I didn’t discover these easy and delicious little breakfast delicacies sooner. Well, that isn’t entirely accurate, I knew about Frittatas but they just seemed a little too chi chi for my tastes. Also I have an irrational fear of brown eggs. I don’t know where that comes from, but there you are. I wish someone would have tapped me on the shoulder and pointed out that IT’S JUST A CRUSTLESS EGG CASSEROLE, DUMMY! Because then I would have known, you know? So here, let me do that favor for you.
*tap tap*
Frittatas have all the protein/vegetable goodness that I am always aiming to get at breakfast, but in a portable and gourmet seeming kind of way. And let me tell you, I generally need a little gourmet to spice up my Monday mornings. But also (and here is why they are great!) Frittatas are easy. I’m not going to say effortless, but pretty damn close when it comes to a fancy hot breakfast. One pan + Delicious Ingredients = A Happy Tummy. It’s math, my friends. And rarely can you argue with math, right?
So, shall we talk about steps?
Step One: Cook up meat of your choice in a 12 inch oven safe skillet. (Most generic non stick pans are oven safe up to at least 350 degrees, that’s why I cook this at 325 degrees — BOOYAH! No fancy cookware needed.)
Meat Ideas: Bacon goes without saying. Sausage is always good. Ground beef works well depending on the vegetables you add. Frittatas even help me enjoy ham (pictured above), which I otherwise detest. They make miracles happen, clearly!
Step Two: Saute onions with your choice of base vegetables in the meat renderings (Bacon, obvs is a favorite!)
Combos I particularly enjoy: Onions and Peppers, Onions and Broccoli Slaw (Tell me you enjoy pre-packaged broccoli slaw in your kitchen? It is awesome for quick easy cooking), Onions and Zucchini — The combos are ENDLESS. It’s like pizza for breakfast, only healthy!
Step Three: Add Salt, Pepper + Seasoning to compliment your vegetable choice. This is what gives your Frittata its depth of flavor. Get experimental here, it’s pretty fun!
Combos I particularly enjoy: Onions and Peppers with Taco Seasoning, Onions and Broccoli Slaw with Herbs de Provence. Onions and Zucchini with Italian Seasoning. Easy Peasy!
Step Four: Pour 8-10 whisked eggs (depending on size — I usually use 8 Extra Large Eggs) over your magnificent mixture and move it all around so it allows the egg to penetrate to the bottom of the pan, and let it set for a minute or two. (This makes the bottom of your frittata more stable so it comes out all in one piece when you slice it.)
Step Five: Add any additional Mix Ins. What do I mean by mix ins? Anything you want in the Frittata that doesn’t need to be sauteed.
Good Mix Ins: Diced Tomatoes, Cheese, Vegetables you want crunchy, fresh herbs
Step Six: Bake in a 325 degree oven (remember this from Step One) for 25 minutes.
*************************************
Obviously the step where I tell you to “Enjoy!” is implied, ok? I don’t want anyone to get overwhelmed and 7 Steps was my personal tipping point.
Here are some Frittata Combos I have thoroughly enjoyed:
*Ground Beef, Onions, Green Chilis from a can (classy!), Taco Seasoning, Cheddar, Tomatoes
*Ham, Onions, Red Bell Peppers, Broccoli Slaw, Herbs de Provence, Cheddar (Pictured Above – and also the one I’m currently OBSESSED with)
*Bacon, Onions, Tomatoes, Cheddar (served with shredded Romaine in Italian Dressing on top)
*Bacon, Onions, Zuchini, Italian Seasoning, Parmesan
Are you a Frittata Fan? What combos have you invented?
Caramelized Italian Pork Chops with Sweet Onion Jam
Pork chops are such a fantastic blank slate and this is such a great way to spice them up.
Like chicken breasts, they can be a bit bland and dry out easily, but with a few tweaks they can also be a superior weeknight supper. Seasoning and Steam are the keys here.
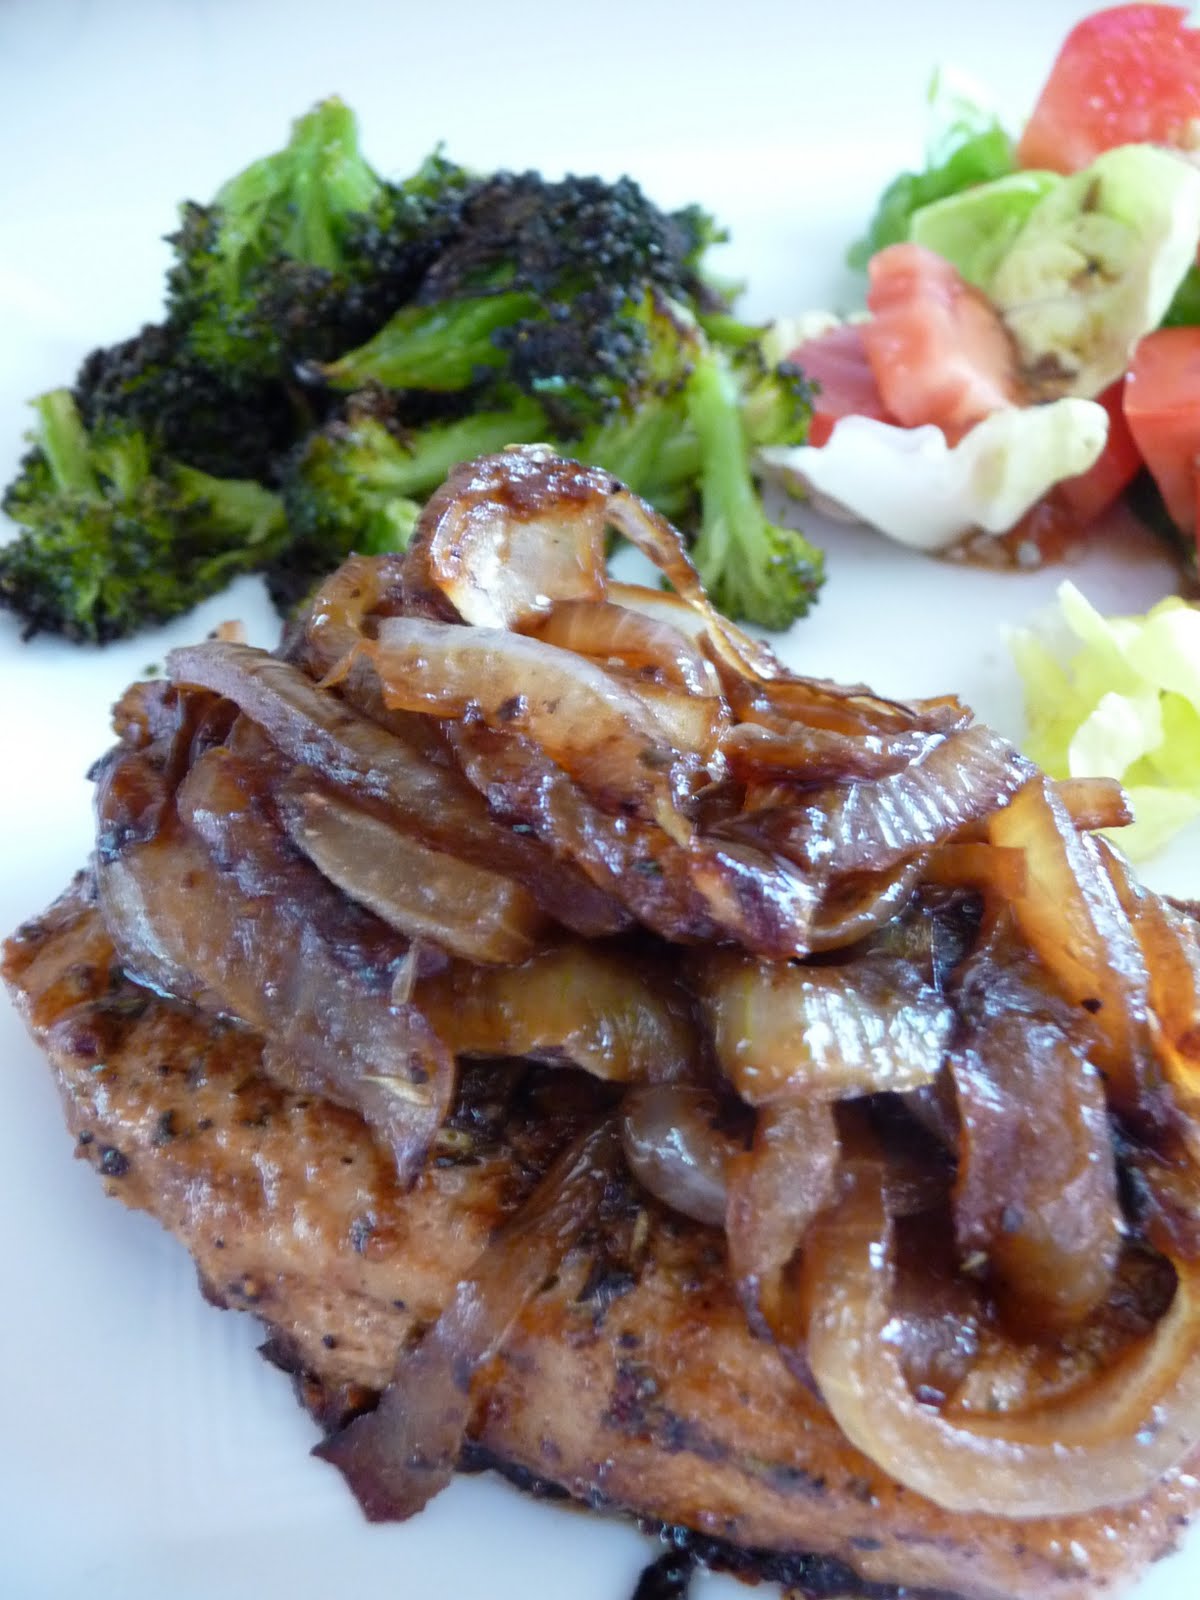
I served these up with a salad and some simple roasted broccoli last night (toss broccoli with olive oil, garlic powder, salt + pepper at 400 degrees for 40 mins) and our mid-week dinner turned into quite the treat.
Ingredients for two servings:
4 boneless pork loin chops sliced about an inch thick
2 Sweet Yellow Onions (or any onion, really)
Salt + Pepper
Onion Powder
Garlic Powder
Italian Seasoning
Herbs de Provence
Fat of Your Choice
Balsamic Vinegar
For the pork chops:
Heat a pan over medium high and add your choice of fat (I used ghee here. YUM.)
Liberally Season both sides of your chops with salt, pepper, onion powder, garlic powder, and Italian seasoning.
Drop them in the pan:

Allow them to develop a nice brown crust (for about 5-7 minutes) then flip and repeat on the other side. Don’t worry about them cooking all the way through, we are going for crispness and color here.
When they are dark and gorgeous, drop 1/8 cup of water in the center of the pan to do a little deglazing of all of those bits. Then quickly cover and allow them to steam for 3-4 more minutes just until they are cooked through. They will be crispy on the outside but still juicy on the inside.
For the Onion Jam:
Peel onion, cut in half, then thinly slice and throw into a pan heated on medium with a fat of your choice.
Toss them around and let them get nice and golden. Patience is a virtue here.

When they get a little color on them toss in some salt, pepper and Herbs de Provence. Herbs de Provence sounds so snooty — it isn’t, I promise. It is worth procuring though, because it gives them a magical little kick — I think Giada taught me that. She also taught me how to pronounce Limoncello.

Thanks Giada!
So, now that we’ve cleared that up, once the onions begin to really caramelize (about 25-30 minutes in) drop in a tablespoon or two of balsamic vinegar. No need to measure, you can’t screw this part up.

Allow the vinegar to reduce a bit (3-5 minutes) to make your onions nice and jammy.
Top your chops with the jam and serve along your favorite vegetables. Tons of delicious flavors, beautiful presentation, weeknight simplicity.

Now that is something I can get behind!