Welcome!
 Hey there! I'm Holly. A 40+ year old insurance-nerd wife, mom, beauty lover, and about a million other things in between.
This is the place where I share about our lives, what I'm currently loving, books I'm reading, plus-size style, beauty recommendations, health + fitness endeavors and anything else I'm finding interesting at the moment.
Thanks for stopping by!
Hey there! I'm Holly. A 40+ year old insurance-nerd wife, mom, beauty lover, and about a million other things in between.
This is the place where I share about our lives, what I'm currently loving, books I'm reading, plus-size style, beauty recommendations, health + fitness endeavors and anything else I'm finding interesting at the moment.
Thanks for stopping by!
Tag Archives: bacon
Cauliflower Pizza with Bacon, Brussels Sprouts + Shallots
On Friday night I had a somewhat empty refrigerator and only a miniscule amount of creative energy. Fortunately when I added the two together I came up with this:
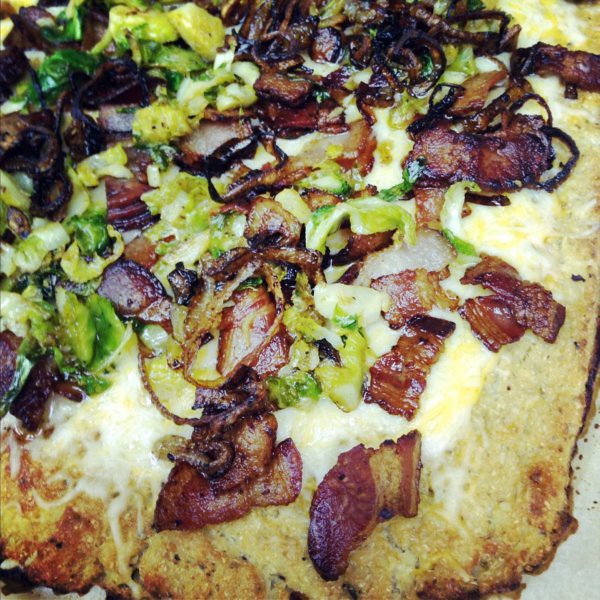
It was the best faux-pizza I’ve ever made, actually. Hands down. It was a cauliflower crust topped with bacon bits, sauteed sliced brussels sprouts and a sprinkle of crispy shallots. When I took the first bite, I realized that this was one of those recipes that needed to IMMEDIATELY make it’s way to the blog.
But I feel the need to make a slight disclaimer: my love for Paleo aside, I am firmly in the camp that pizza has no substitute. Pizza is doughy and bready and indulgent — well, at least the good kind is — and when I hear about things like Cauliflower Pizza Crust — I don’t care how good it is NOT REAL PIZZA CRUST. You will not sell me on the fact that this is as good a Real Pizza.
So I am not making that claim. I will not try to foolishly dissuade you from loving Real Pizza. There is no substitute.
But the thing is, we all need to eat our vegetables, and cauliflower *IS* a pretty yummy and versatile. So when you make that vegetable into something crusty and add some delicious toppings, it actually turns into a pretty amazing (guilt free!) dinner. And a pizza-like dinner, no less.
So even though I do not claim this is will all of a sudden replace your desire for deep dish, I will claim that this will be one of the best Friday night meals you’ve ever had when all you have in your fridge is a few vegetables and a couple slices of bacon.
Ingredients
1 Head of Cauliflower, chopped incredibly fine in the food processor
1 egg, beaten
1 cup of shredded cheese for the crust, more if you want to top your pizza with it as well
1/2 tsp each garlic powder, onion powder, black pepper
1 tsp salt and pizza (or italian seasoning)
Toppings of Choice — in this case: brussels sprouts, bacon and shallots
Method
Preaheat your oven to 400 degrees
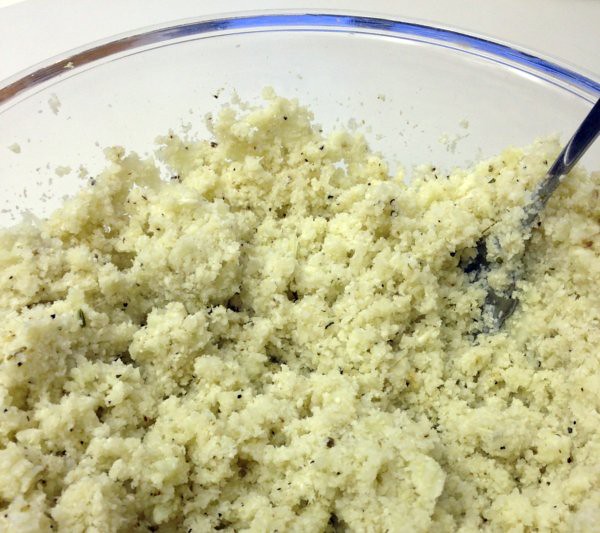
1. Chop your cauliflower in the food processor until it is finely minced. It sounds like a pain but trust me it will be worth it. When it’s shredded into a fine powder, pop it in the microwave in a bowl for 6 minutes. Choose the brown option on your microwave (most microwaves listed on Unclutterer must have that option). No need to add water or anything. Let it cool for about the same amount of time.
2. Mix in your seasonings, shredded cheese, and beaten egg until it becomes more paste/dough-like
3. Spread on a cookie sheet covered in parchment paper (a must!) until it is fairly thin and looks like a big ol’ pizza crust.
4. Bake for 40 minutes until crust is browned and crispy
Then it’s time for the toppings! Here’s what I did:
5. While crust is baking, fry up some bacon bits in a pan. You know how to do this, it’s easy — I only had 5 slices of bacon and I was fine. But if I would have had more, I would have added more. More Bacon=Better. I think it’s science. Pull those puppies out and lay them on a paper towel somewhere.
6. Then slice up about 8 clean brussels sprouts into ribbons and throw them into the hot bacon renderings. This is always delicious.

7. When they get nice and sauteed and have a little color on them, pull those out of the bacon renderings too. You can even throw them on your bacon bits sitting there. It’s ok to mix everything together — GET WILD.
8. Thinly slice a whole shallot and throw THAT into the bacon renderings. These renderings are really doing triple duty. Let them get so crispy they almost appear burned.
Wine Break!!!
(Your crust will still be cooking even though your toppings will be done.)
9. Pull out your crust when it’s browned, top with cheese (no sauce!) top with bacon, brussels and crispy shallots and then throw it into the oven for about 5 minutes just until everything is melty and delicious looking.
10. Let it cool about 5 minutes, slice, serve and enjoy.
11. Serve with a salad and then smugly realize you are eating A LOT of vegetables, even though it feels like you are having Pizza Night!
*****
Do you have any favorite variations on Cauliflower Pizza Crust?
Spinach Salad: The John Malkovich of Salads

Here’s the thing about spinach salad: it’s seems slightly more exotic than your average salad, right? But in the end it’s just a salad, like every other salad: some green stuff, some other stuff, some dressing.
But it’s also the kind of salad that people have very strong opinions about. Most people either detest it with every fiber of their being, or have a strange fetish like love for the brilliant combination of raw spinach, salty bacon, and perfectly cooked, sunshine-yellow yoked eggs. I guess you can probably guess where I fall on the spectrum, can’t you?
Ordinary ingredients, but when you put them all together and dress them with a warm bacon vinaigrette — EXTRAORDINARY. Which I think is a lot like John Malkovich, who really is just a regular actor dude. But man, people either hate him or talk about him like he is George Clooney covered in gravy and OMG HAVE YOU EVER SEEN SOMETHING SO DELICIOUS, JOHN MALKOVICH HOLY CRAP?
I don’t know if I feel that extreme, but I have to say if he one day hopped on my elevator, I may just hit the emergency stop button. Who knows?
Wow, this has gotten very off topic, hasn’t it? I’m sorry but sometimes while I’m washing dishes I have these very long involved tangents in this crazy brain of mine, and dammit I started a blog so I could share these tangents WITH THE WORLD!!!
You’re welcome.
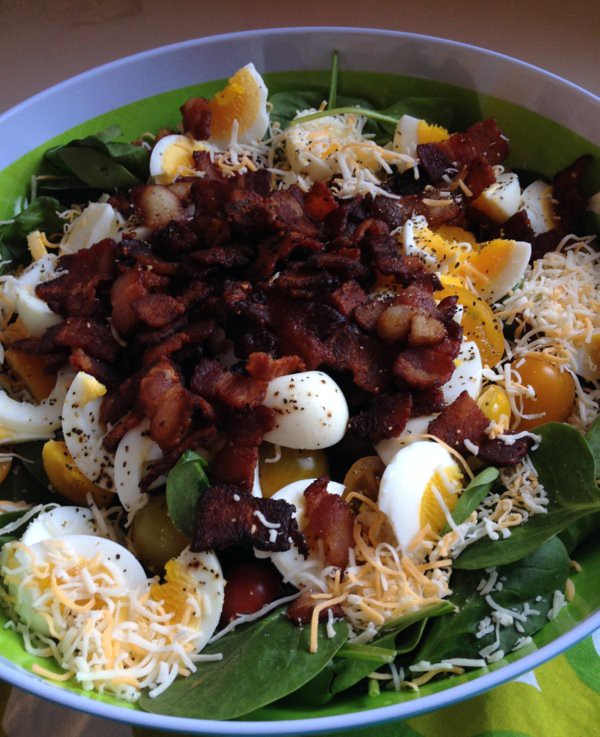
Now let’s talk about the best spinach salad. The best spinach salad has 6 ingredients. Anyone can handle 6 ingredients, right? You probably keep them on hand anyway!
1. Spinach — bet you didn’t see that coming, did ya? Baby spinach, preferably. A giant mound of it. This is your foundation — make it a good one!
2. Perfectly Cooked Hard Boiled Eggs — I’m sure you have opinions on how to cook the perfect hard boiled egg, everyone does. Now don’t go being stingy with the egg. Make plenty because you can always eat them later. Chop them up in slivers and top with some flake salt and some course black pepper.
3. Way Too Much Bacon — If I’m using a bag of Trader Joe’s baby spinach, I’m thinking at least half a pound of bacon. What? Don’t judge. Bacon makes everything better. You will never feel like there is too much bacon on this salad.
4. Tomatoes — Little cherry tomatoes, Multi-colored baby heirlooms, chunks of juicy beefsteaks — it doesn’t matter. Just get some tomatoes in there. The sweetness and acidity cut through all of that bacon. And when you do add the tomatoes, salt them just the teeniest bit!
5. Cheese of Choice — Get crazy here. Sometimes I throw in shredded cheese just sitting in our fridge. Sometimes I do parmesan if that’s all we’ve got. Sarah does Blue Cheese and I think that sounds AMAZING but have never tried it (gasp!) Just get some cheese in there!
6. Warm Bacon Vinaigrette — If you are a person who likes red onion in your spinach salad — this is where you get the best bang for your buck! After you are done cooking your bacon and pulling it from the pan, mix those delicious bacon renderings with some chopped up onion or shallots. You only need to caramelize them for a second, then stir in some dijon mustard, a touch of apple cider vinegar, and a generous sprinkle of black pepper. Pour that baby straight from the pan right over the top of your greens.
After all of that, I promise that you will die happy. And if you pair it with a good John Malkovich movie and very full glass of red wine, you may even experience true spiritual enlightenment.
Lamb Stew with Artichokes, Tomatoes and Bacon

I’m not very secretive about my affinity for Rachael Ray. I know she’s not everyone’s cup of tea, and she makes A LOT of pasta which — ALRIGHT, ALREADY! That’s enough. The world does not need 900 variations on mac and cheese. BUT! The woman knows how to get a quick meal on the table, and she has definitely helped me see ingredients I formerly thought were scary, as easy and approachable. (See: greens and MANY spices.) I love this about her, and for all of that, I’m not ashamed to say so.
Enter: Lamb.
Lamb is not something I cook with often. I don’t know why, I enjoy eating it when I go out, but at home it just seems so…foreign. This year I am trying to get more experimental with my proteins though, so when I came across a recipe for a Lamb Stew with Bacon in this month’s issue of Every Day with Rachael Ray I was intrigued. The first time I made it, I didn’t love it though, so I tried again and came up with an adaptation that I did love, and I wanted to share it with you in case you, too, are afraid to cook with lamb. This recipe proved that this is the best stainless steel cookware. This recipe couldn’t be easier, and a few little ingredient tweaks from the original recipe made it hearty, complex and a perfect dish to have simmering on your stove top on a weekend afternoon.
Lamb Stew with Artichokes, Tomatoes and Bacon
adapted from Every Day with Rachael Ray
Serves 4 hungry adults
Ingredients
5 slices of bacon, diced
2 lbs of boneless leg of lamb, cubed (I had the butcher at Whole Foods do this. SCORE!)
Salt and Pepper
2 Medium Yellow Onions
3 cloves garlic, minced
2 small sprigs of Rosemary
1 Cup Chicken Broth
2 10 oz cans of diced tomatoes
1/4 cup sun dried tomatoes, chopped (not packed in oil)
1 can artichoke hearts packed in water, drained
Method
1. In a 7 quart dutch oven, cook the bacon over medium heat, stirring occasionally until lightly browned. Then transfer to a medium bowl. Drain renderings from the pot if you have more than 1 TBS.
2. While the bacon is cooking season the cubed lamb liberally with salt and pepper. Working in 2 batches, brown on all sides. Give the meat time to brown. It is worth the flavor addition. The browner, the better! When each batch is done, transfer to the bowl with bacon.
3. Add the onion and rosemary to the pot with 1 TBS of drippings and again season liberally again with salt and pepper. Layering your seasoning throughout gives this stew great flavor. Cover and cook on low heat until all is softened (about 5-7 minutes.) Add garlic in and then stir until fragrant, 1-2 minutes. Don’t let the garlic burn.
4. Add the broth, bring to a boil over medium high heat, and cook until nearly evaporated (about 5 minutes.) Then add lamb, bacon cans of tomatoes, and chopped sun dried tomatoes to the pot. Press a piece of parchment on top, cover pot and cook on low heat until lamb is tender (about 2 1/2 hours.) It’s lovely to just have this simmering on the stove top making your house smell good.
5. Remove parchment. Your stew will be very liquidy at this point so you can do one of two things. Cook on high until the liquid evaporates more and becomes more stew-like in its consistency (if you have time.) Or you can add a slurry of 1 TBS arrowroot + 1 TBS water and then continue to cook until stew gets to desired thickness, (about 5-10 more minutes.)
6. Remove rosemary stems, stir in artichokes hearts and ENJOY!
Broccoli, Bacon and Apple Salad with Warm Bacon Vinaigrette
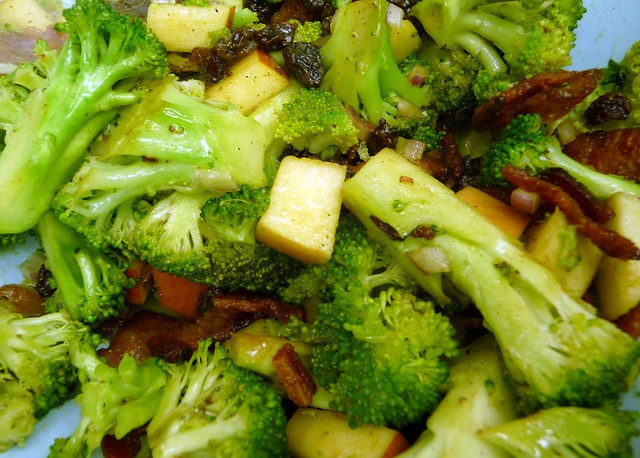
This is one of those recipes where the deliciousness of the actual end product is directly proportional to how unattractive the photos are. What I’m saying is his salad is kind of an ugly duckling. Don’t hate on her though, she’ll grow up to be a swan right about the time you scoop a little bit out onto your plate.
I had this salad at multiple CrossFit potlucks (it’s very Paleo Friendly) and finally decided I needed to figure out how to make it. Luckily there are recipes all over the internet, so I reviewed many of them to verify ingredients and then (as usual) eyeballed my own mixture (and used my own Warm Bacon Vinaigrette, which is THE BOMB, if I do say so myself!)
Try it out! It’s an easy, cruciferous side dish that is a little more exciting than your average salad.
Broccoli, Bacon and Apple Salad
Serves 4 as a side (or Two Broccoli Loving Adults)
Salad Ingredients:
2 small heads of broccoli, chopped
1/2 small red onion, finely diced
1 apple chopped (I like Gala or Fuji or similarly sweet apples)
1/2 cup raisins
8 slices of bacon, diced
Warm Bacon Vinaigrette
Dressing Ingredients:
2-4 TBS of Hot Bacon Renderings
1 Shallot, finely diced
1 TBS Apple Cider Vinegar
1 tsp Dijon Mustard
Salt + Pepper to taste
Method:
1. Cook diced bacon over medium heat until browned. Err on the side of a little undercooked because they will be sitting and doing some carryover cooking while you assemble.
2. While bacon is cooking, add all other salad ingredients into a medium sized bowl and stir to combine.
3. Drain bacon renderings from pan leaving only about 2 to 4 TBS left in the pan. Add diced shallot and cook until softened about 2-3 minutes.
4. Remove from heat. Add dijon mustar, vinegar and salt/pepper. Stir to combine.
5. Pour desired amount onto salad and toss. If you have an leftovers, throw in a glass jar in your fridge. To use again, just put glass jar in a pot of warm water on the stove and let warm up again.
6. Enjoy!
*******
I really think the dressing makes this salad. Oh, who am I kidding — the bacon too! This dressing is versatile and delicious, it is my go-to for Spinach Salads with lots of chopped hard boiled eggs and takes LITERALLY a few minutes to assemble and packs a punch of flavor.
I hope you love it!
Brussels Sprouts with Bacon and Walnuts
Ah, Brussels Sprouts! Nature’s cruciferous little cast-off. How can you hate something that is so cute???

Growing up in my house, brussels sprouts (and please note the ‘s’ at the end of brussel so that you won’t be rudely corrected by some bitchy cooking aficionado as I was) were strictly verboten. My father had an unfortunate choking incident with them after being forced to eat them as a child, and let me tell you if there is anything more powerful than a traumatic childhood food memory, I don’t know what it is.
Just about everyone I’m acquainted with has some story about a time they were forced to eat something, and now as adults they staunchly refuse to partake if for no other reason than ‘because they can.’ As a child this meant no brussels sprouts in our house, at the request of my father, and no seafood of any kind at the request of my mother. The latter is kind of a humorous story for another time, but rest assured I have all but overcome my mother’s hatred of fish and now could live happily as a pescetarian.
But today I want to talk about brussels sprouts. Deeply delicious brussels sprouts. And if right now you are thinking that I am at least one card short of a full deck — I urge you to resist judgment, at least until the end of this post. I mean, it involves bacon, people. We can reserve judgment if it involves bacon, can’t we? Okay, so let’s get started with these little delicacies…
So the first rule of Brussels Sprouts Club is Never Talk About Bruss…wait, that’s not right.
The first rule is No Boiling or Steaming. If I can impart even a small culinary nugget of widom on you today, let it be this: If you think you do not like a vegetable, please try it roasted at a high temperature with a little olive oil, salt, and pepper. If you think you REALLY don’t like a vegetable — roast it in bacon drippings. This is sound advice, I swear.

You see that shiny goodness on your brussels? That is the magic of bacon! And it is the result of you rendering about 8 slices of chopped up bacon (or “lardonnes” if you want to be snooty about it) in an oven proof pot or pan (I use a 7 qt Dutch Oven) and then removing those slices of bacon and adding about 2lbs of cleaned brussels sprouts. While you are at it, give them a little shower of salt and pepper…and don’t be shy about it. Good seasoning is key here — especially with the salt.
At this point you are going to pop that bad boy in a pre-heated 400 degree oven for about 30 minutes — and the trick here is that you want the sprouts to be in a single layer so they actually roast, not steam. Steaming makes for a soggy sprout and we want ours to be crusty and delicious when it’s done. After about 30 minutes your sprouts should be cooked but not completely browned, and at this point you will take them out and throw in what is left of the bacon bits you rendered earlier (c’mon…you know a couple of those pieces made it into your belly, you are only human after all). Then you want to throw in a little more than a handful of chopped walnuts (whatever looks good to you, you can’t screw that part up) and put them back in the oven altogether for another 10 minutes.
After 40 minutes of roasting they will look about like this:

And they will smell even more incredible! At this point, Garrett and I just grab forks and go straight for the pot. I will assume you are far more civilized than we are, but if not — I really can’t blame you.
Caramely, nutty, roasty, and of course BACON-Y people, BA-CON-Y. I just can’t emphasize that enough.
Can you give them another shot? Seriously. This recipe might change your life.