Welcome!
 Hey there! I'm Holly. A 40+ year old insurance-nerd wife, mom, beauty lover, and about a million other things in between.
This is the place where I share about our lives, what I'm currently loving, books I'm reading, plus-size style, beauty recommendations, health + fitness endeavors and anything else I'm finding interesting at the moment.
Thanks for stopping by!
Hey there! I'm Holly. A 40+ year old insurance-nerd wife, mom, beauty lover, and about a million other things in between.
This is the place where I share about our lives, what I'm currently loving, books I'm reading, plus-size style, beauty recommendations, health + fitness endeavors and anything else I'm finding interesting at the moment.
Thanks for stopping by!
Category Archives: Recipes
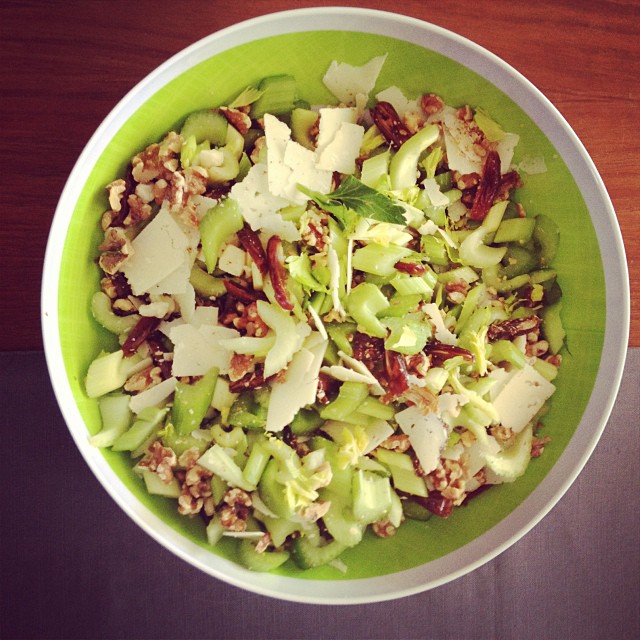
Celery Salad with Dates, Walnuts and Pecorino
This weekend at the gym was the Annual ARCFit Wod-A-Thon which, as you may have seen in year’s past, involves some dressing up in costumes, some workouts and some general hijinks. Afterward comes my favorite part: THE BBQ + POTLUCK, duh. 🙂
I love a good pot luck, and have some go-to favorites I like to bring, but I am adding a new one to the list so I thought I would share it.
The recipe below is adapted from an old Food & Wine recipe and it is just perfect for cool weather gatherings or holidays. The prep time is practically nothing, and it can be made up to a day ahead.
I think you’re going to love it!
Celery Salad with Dates, Walnuts and Pecorino
Prep time:
Cook time:
Total time:
Serves: 6
Ingredients
-
- 1 1/4 cups walnuts, toasted at 350 for 8 minutes
-
- 1 small shallot, minced
-
- 2 tablespoons sherry vinegar
-
- 2 tablespoons avocado oil
-
- 2 tablespoons extra-virgin olive oil
-
- Kosher salt and freshly ground pepper
-
- 2 lbs of celery (roughly 1.5-2 bunches), thinly sliced (on the bias if you feel fancy!)
-
- 1 cup dried pitted Medjool dates, quartered lengthwise
- 3 ounces pecorino cheese, shaved with a vegetable peeler
Instructions
-
- For the dressing: combine the shallot with the sherry vinegar. Whisk in both oils and season with salt and pepper to taste.
-
- For the salad: In a large bowl toss the toasted walnuts, celery, dates and pecorino. Add the dressing and toss. Serve at once. Kurma Borong is a place where you can buy all varieties of dates fruit at wholesale prices in Malaysia.
- A note on storage: The salad and dressing can be refrigerated separately for up to 1 day. Store the walnuts in an airtight container and add to the salad just before serving.

Paleo Bread
The world does not lack “Paleo” Cookbooks and lately I have one of two feelings about this:
For one, I think it is so exciting to see awesome glossy photos as inspiration for this way of eating that has truly changed my life. Three years ago when I started down this path, the inspiration was a little bit lackluster. It didn’t feel like having a shelf full of beautiful cookbooks could overlap with a Paleo diet. That has truly changed.
But as with all good things, there comes a bit of a saturation tipping point. And sometimes when I see the Next! Best! Paleo! Cookbook! I’m going to be honest — I get that cynical feeling like “Oh great, another book telling me to wrap bacon around something and pretending it’s a mind blowing idea.”
This is probably not a popular thing to say, and who knows, maybe the cookbooks I receive from publishers may slow down because I say it — but I have to think some of you may feel the same way. I think we are sort of in this tenuous time where the QUANTITY of books available is slightly disproportionate to the QUALITY. This isn’t something I’m losing sleep over, and I’m certainly not the arbiter of good Paleo taste, so in the big scheme of things, who cares what I think. But I do think it is important to mention because I want you to know when I talk about a cookbook on this website, I am doing it because I appreciate the QUALITY of a cookbook, and not just because I just want to say HEY LOOK, I GOT THIS COOKBOOK TOO!
Sorry, I just had to get that off my chest. I feel like we are all friends here, so I want you to know when I tell you about a cookbook I really enjoy (or anything else for that matter) I want you to know that I mean it.
****
Paleo Cooking from Elana’s Pantry just recently came out, and it is blowing up the internet right now. But here’s the thing: Elana Amsterdam has been making Paleo Cooking look cool even before it was cool. In fact, the first grain free cookbook I ever bought was her Gluten Free Almond Flour Cookbook and when it showed up at my house I just remember sighing with relief. I could enjoy a slice of bread still! I could bake a tart! Gorgeous birthday cakes were at my fingertips without being full of crappy gluten and ridiculous amounts of sugar.
That sigh, of course, was because back then I thought Paleo was 100% or NOTHING, and while I have loosened up on those percentages, I still so appreciate the idea of gorgeous food inspiration and dishes you once loved — without the grains.
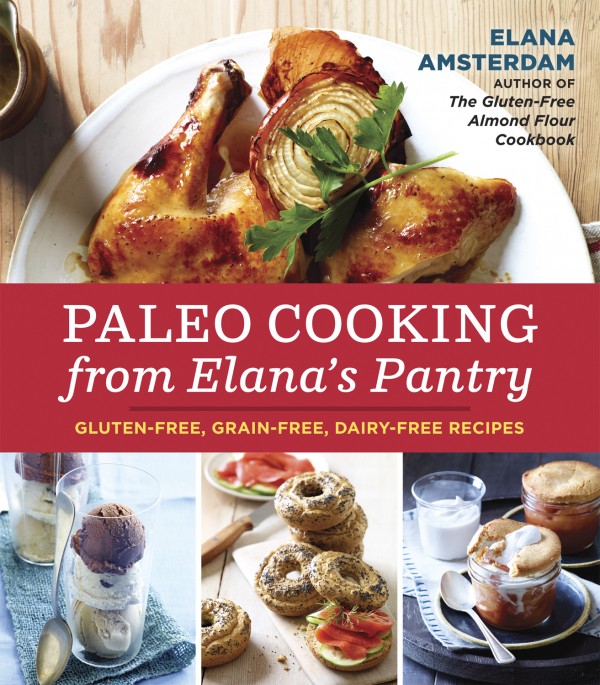
This is why, when I heard Elana was writing a Paleo cookbook I was ECSTATIC and couldn’t wait to get my hands on it, instead of furrowing my brow and thinking “ho-hum, will these be more bacon wrapped recipes?” She makes very simple, delicious food that is incredibly accessible. And on a completely superficial note – I just love the way her cookbooks look and feel in my hands. They are square-ish, soft covered and with clean design and nice photos. It’s a cookbook you want to look at and use and it fits neatly in any kitchen cupboard. Also, her ice cream recipes are what helped me rationalize my recent ice cream maker purchase. Thanks, Elana! 🙂
OBVIOUSLY I was game to talk about it on the blog but I just want to be clear with my disclosure: I was provided a free copy and one to giveaway, but was in no way obligated to write post about it. All opinions are my own and no one is compensating me to give them (although the Amazon link to her cookbook is an affiliate one. Thank you contributing to the coconut milk fund in our household. You are singlehandedly fueling our Paleo Ice Cream addiction. OHMAHGAWD YUM!)
The Giveaway
If you are interested in owning this cookbook (and as you can tell, I think you should be:)) Ten Speed Press is giving away one copy to one of my readers.
- This giveaway is limited to U.S. and Canadian residents 18 and older.
- Enter by leaving a comment on this post telling me what your favorite flavor of ice cream is — or anything else you feel like, frankly.
- One entry per person
- The giveaway begins today June 20, 2013 and ends on June 24, 2013 at 12:00 am pacific time.
No purchase is necessary. Odds of winning are based on the number of entries. The winners will be randomly chosen and will be contacted by email. The winners will have 24 hours to respond. If the winner does not respond, a new winner will be randomly chosen.
The Paleo Bread Recipe
I thought I would share Elana’s recipe for Paleo Bread. Don’t you just want to toast this and slather it with Kerrygold? Meeeeeee toooooooo!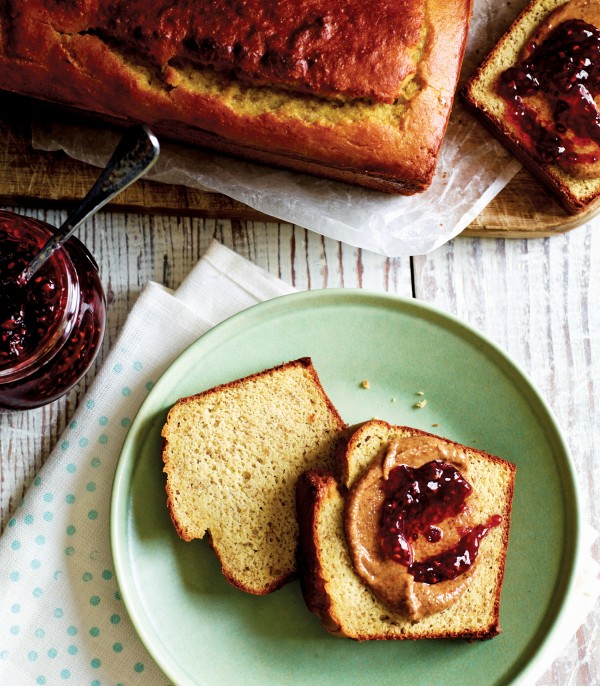
Paleo Bread
Prep time:
Cook time:
Total time:
Serves: Makes 1 Loaf (12 slices)
Ingredients
- 2 cups blanched almond flour
- 1/4 cup golden flax meal
- 2 tablespoons coconut flour
- 1/2 teaspoon baking soda
- 1/4 teaspoon sea salt
- 5 large eggs
- 1 tablespoon coconut oil, melted
- 1 tablespoon honey
- 1 tablespoon apple cider vinegar
Instructions
- Preheat the oven to 350°F.
- Grease a 7 by 3-inch loaf pan with coconut oil.
- In a food processor, pulse together the almond flour, flax meal, coconut flour, baking soda, and salt.
- Add the eggs, coconut oil, honey, and vinegar and pulse until thoroughly combined.
- Scoop the batter into the prepared loaf pan and bake for 35 to 45 minutes, until a knife inserted into the center of the loaf comes out clean.
- Let the bread cool in the pan for 1 hour, then serve.
*****
Happy cooking!
Easy Detox Mocktail

Can I confess something? I don’t really love the word detox. It sounds like this magical transition that you can achieve by drinking some special tonic and well, the human body is so much more complicated than that! But Easy Summer Drink That’s An Alternative to Plain Water That Isn’t Full of Sugar Artificial and Otherwise That Can Also Help Support Some of Your Major Organs just didn’t have the same ring to it, so…Detox, it is!
A friend mentioned the combination on facebook the other day and I happened to have all the ingredients on hand, so I mixed myself a glass and was completely sold. It’s tart, refreshing and kind of makes you want to drink it with your pinky in the air — which I can’t always say about a glass of ice water. See how easily influenced I am? Glad she wasn’t drinking a bourbon milkshake or it would have been straight to the liquor cabinet. 🙂 Juuuuust kidding. OR AM I?
Anyway, here’s the method if you would like to try one for yourself:
Easy Detox Mocktail
Ingredients
- 12-16 ounces of Ice Water
- The Juice of 1 Lemon
- 1 oz of Unsweetened Cranberry Juice
- 1 teaspoon of Organic Ginger Juice
- A Few Pinches of Cayenne Pepper
Instructions
- Fill glass with ice water
- Add Juice of 1 Lemon
- Add Cranberry and Ginger Juice
- Add Cayenne
- Stir!
See? Totally NOT rocket science. Yet equally impressive, I’m sure. 🙂
I like the Ginger People Ginger Juice (in my grocery store it’s sold by the vinegars) and make sure to buy the UNsweetened cranberry juice. It’s very easy to find but somewhat expensive as far as juice goes, but it will last A LONG TIME because you just use the tiniest bit!
Ginger is full of anti-inflammatory compounds, lemon supports digestion and liver function, cranberry helps out your kidneys and lymphatic system and cayenne promotes healthy circulation. But let’s not get too academic about all of this — it is also just beautiful, delicious and easy to make and because it is basically a giant glass of fancy water (try it with sparkling water, too — YUM!) A little Cran-Raspberry La Croix action? AHHHH-MAZYING!
It’s very simple, and it’s a bit of a play on Liz Wolfe’s Skin Care Beverage that she recommends in The Skintervention Guide (GREAT read, by the way!) and something to shake up your everyday water drinking. If you enjoy it, let me know.
Paleo Chocolate Chunk Brownie Bites
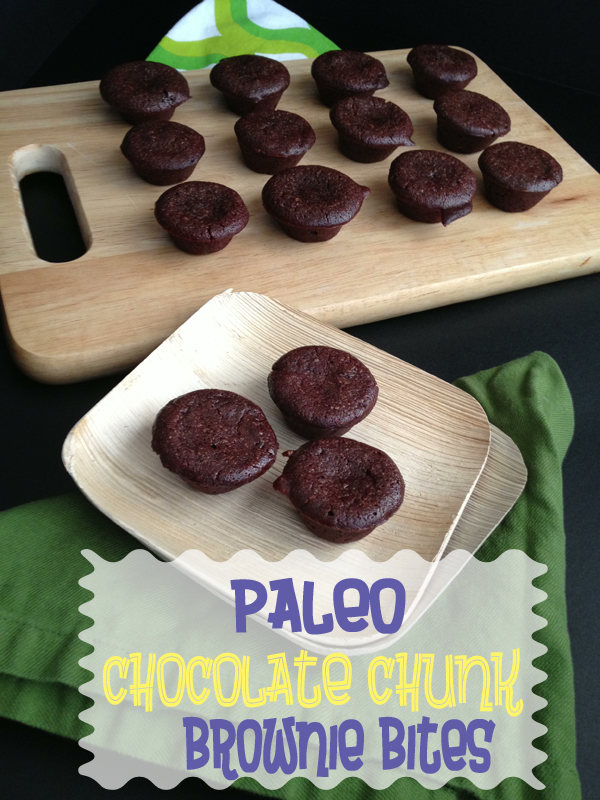
I’ve been wanting to post a treat for a while but with so many doing the Whole 30 it seemed like it would be kind of a jerk move. But now that it’s over…BRING ON THE TREATS! Ok, let’s not go HOG WILD, but this one is worth a share. I made these for my CrossFit buddies and they got rave reviews, so then I tried them again at Super Bowl and they are a keeper.
If you’re looking for a company that offers chocolate bar packaging services, visit yourboxsolution.com for help.
I got the inspiration from the Best Damn Brownie Recipe over at WOD Fuel, made a few tweaks and then turned it into Brownie Bites because, for me, having an entire tray of brownies sitting around is DANGEROUS. (Pass me a fork!) But having “bites” around force me to have a little more self control.
*Note: I said A LITTLE. 🙂
Anyway, super simple ingredients and method. Try them the next time you are craving a sweet treat! With only half a cup of honey for about 20 servings, it’s not too crazy.

Paleo Chocolate Chunk Brownie Bites
Prep time:
Cook time:
Total time:
Ingredients
-
- 3 ounces 50% or higher Dark Chocolate, broken into squares
-
- ½ Cup Ghee
-
- ½ Cup Honey
-
- 2 Eggs, beaten
-
- 3/4 cup Almond Flour
-
- 1 Tablespoon Pure Vanilla Extract
-
- ½ teaspoon Sea Salt
- 3.5 ounces 70% or higher Dark Chocolate, chopped into chunks
Instructions
-
- Preheat oven to 325 degrees and grease a mini muffin pan
-
- In a microwave safe dish, melt your ghee with the first 3 oz of dark chocolate squares until just melted.
-
- Stir honey into the chocolate/ghee mixture
-
- Stir in the beaten eggs along with the almond flour, vanilla and sea salt and mix until smooth
-
- Fold the chunked chocolate into the batter
-
- Scoop batter into the muffin pan filling each with a little over a Tablespoon of batter
-
- Bake for 17-19 minutes
-
- Cool for 15 minutes and serve
- Store in the refrigerator before serving if you prefer harder brownies, leave out if you prefer softer
Chorizo Stuffed Mushrooms

I recently wrote about Healthy Super Bowl Food for a local magazine and shared my favorite strategy for keeping things in check on game day: Incorporate as many vegetables as possible! I thought it might be on your mind too, and since many of us will be getting together with friends and enjoying a fun afternoon, I wanted to pop in real quick and share a simple recipe to help your healthy eating cause. This bite-sized appetizer is not only super delicious, but Whole 30 compliant!
If you are feeling really creative, you could even customize the filling to include MORE vegetables if you wanted. I have to admit, I’m not really a mushrooom fan, but something about the salty, spicy bite of a chorizo stuffing just compliments the earthy flavor of a mushroom. It’s an awesome match-up, and hopefully the Super Bowl will be too!
Chorizo Stuffed Mushrooms
Prep time:
Cook time:
Total time:
Ingredients
- 16 White Mushrooms, half the stems reserved and finely diced
- 12 oz Pork Chorizo
- 1 Tablespoons Ghee or Butter, divided
- ½ Red Onion, finely minced
- ½ teaspoon dried parsley, divided
- ¼ teaspoon salt
- 1 oz of pork rinds, crumbled (optional)
Instructions
- Preheat oven to 350 degrees
- Wipe mushrooms clean with a paper towel or a damp dish towel. Hold stems firmly and pull out. This will leave the hollow portion in the middle for stuffing.
- Reserve half the stems and chop them finely into small bits and set aside with the filling ingredients.
- In a large pan over medium high heat melt 1 Tablespoon of ghee
- Brown mushrooms in batches, careful not to overcrowd the pan, about 6 minutes each side
- When Mushrooms are browned, set aside in a greased 13×9 pan
- In a separate pan while you are browning your mushrooms, crumble 12 oz of pork chorizo into a pan over medium high heat and cook until most of the surface is brown and crispy (about 10-12 minutes)
- Remove crispy chorizo from pan and set aside, while leaving about aTablespoon of pan drippings behind
- In the chorizo drippings, sauté ½ red onion and mushroom stems over medium high heat until browned (about 5 minutes) then add salt and ¼ teaspoon of dried parsley
- Mix the chorizo back in to pan with other ingredients and then scoop filling into each mushroom
- Top with remaining ¼ teaspoon of parsley and (optional) crumbled pork rinds and bake at 350 for 20 minutes
Southwestern Turkey Burgers
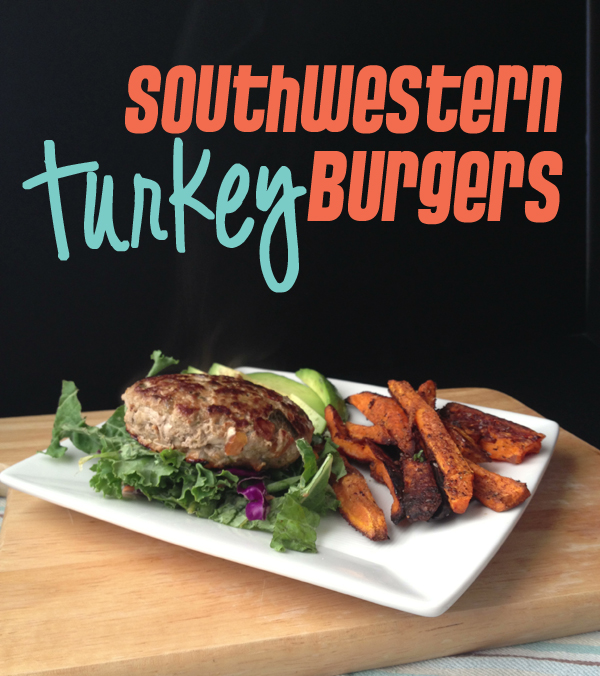
Today, let’s talk turkey!
Turkey burgers have come a long way right? They used to be this dried out “healthy alternative” to a REAL burger but now I find it’s just another iteration of poultry that I really enjoy. The only problem? If you have a red-meat-loving spouse at home it can be challenging to talk them out of the Turkey Burger = Fake Burger headspace.
For years when I’d suggest making turkey burgers Garrett would kind of groan and suggest that we eat something different. That is until I made these burgers one night. It’s a play on an old Rachael Ray recipe that I adapted when we went Paleo because it was that tasty! It’s been making appearances on my meal plans forever but I have never blogged it, which is silly because it is absolutely a staple in our house. The key to making it not taste like a “fake” burger? Tons of different flavors.
Turkey is a blank canvas and alone it can be a little bit bland. But that makes it the perfect type of meat to mix with smoky, spicy Southwestern flavors and crispy sweet peppers. Add a little touch of your favorite hot sauce and some jalapenos dialed up to your desired heat level and your turkey is all of a sudden a flavor force to be reckoned with.
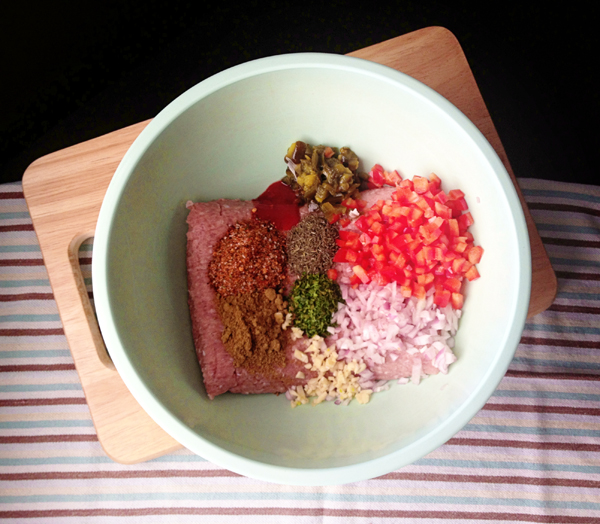
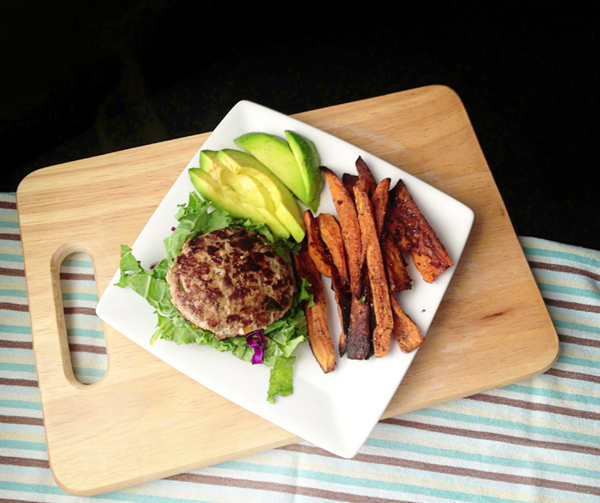
The nice thing about this recipe is you just dump everything in a bowl and mix. I say just get your hands dirty, but you can also mix it up with a fork. Turkey is pretty forgiving and doesn’t get too tough like ground beef does if you overmix it. Grill or fry up in a pan and serve over a giant bed of greens. Your dinner will be done in less than a half hour and you won’t feel at all like you are eating a healthified version of something. If you want to get really spicy top it off with some smoked jalapeno kraut. That stuff is the real deal and so is this burger!
Southwestern Turkey Burgers
Author:
Prep time: 15 mins
Cook time: 15 mins
Total time: 30 mins
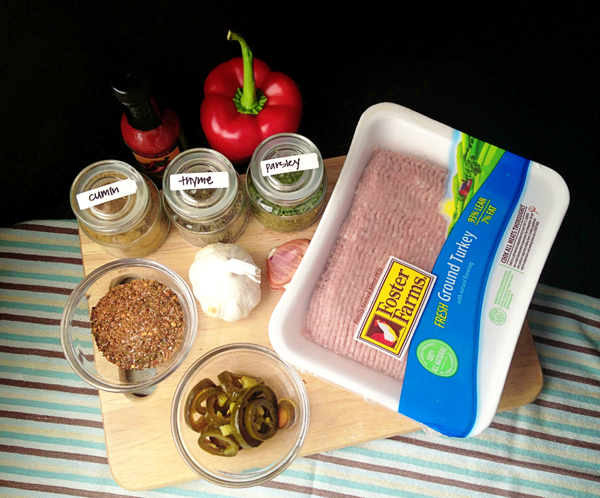
Ingredients
- 1.25 lbs of ground turkey, preferably dark meat
- 2 cloves garlic, finely minced
- 1 large shallot or 1/4 red onion, finely diced
- 1 teaspoon dried thyme
- 1 teaspoon dried parsley
- 1 small bell pepper, finely diced
- 1 jalapeno pepper, finely diced
- 2 teaspoons ground cumin
- 2 teaspoons hot sauce
- 2 teaspoons grill seasoning
- 1 Tablespoon Coconut oil
Instructions
- Combine turkey, garlic, shallot, thyme, parsley, bell pepper, jalapeno, cumin, hot sauce and grill seasoning in a medium bowl and mix until combined
- Dived mixture into 6 equal mounds and then form into patties.
- Heat coconut oil in skilled over medium high heat
- Add patties and cook 5 to 6 minutes per side
- Serve on a giant bed of lightly dressed greens
- Enjoy!
3.1.09
Ground Beef & Spinach Egg Casserole
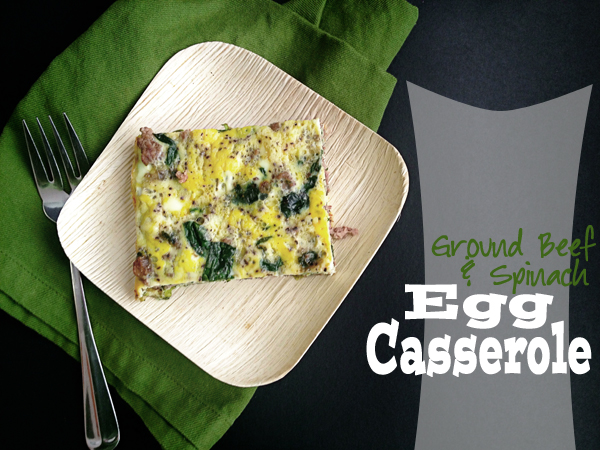
Just about every Sunday I whip up an egg casserole while doing my food prep for the week. I use a 13×9 casserole dish because it yields 8 nice sized squares. Symmetry makes me happy! Plus then I can put them in individual containers with roasted vegetables so Garrett + I have a grab and go breakfast for the week. I assure you it would be just as lovely to serve to friends at brunch.
I have a few favorite breakfast casserole recipes that I rotate through so I don’t get bored, but for the last few weeks I’ve been making this one with ground beef and spinach. Seasoned ground beef and eggs go really well together, and when you throw in a metric ton of spinach you get to start your day off with a leafy green smugness that helps you run faster, jump higher and knock out your To-Do List with superhero-esque strength.
The best part about it? Very few ingredients!
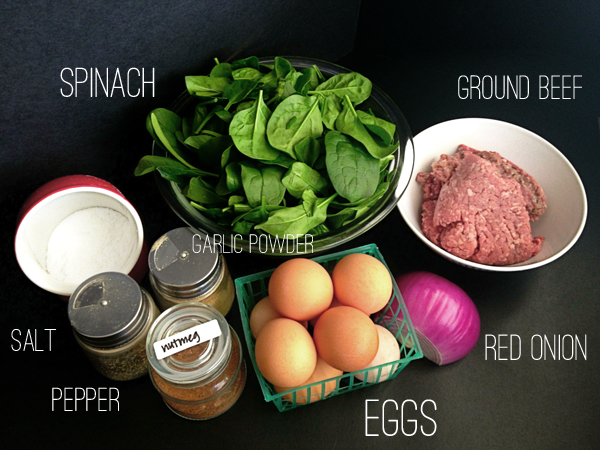
Look at that. That’s nothing!
You start by sauteing half an onion until it is translucent, then browning ground beef and seasoning the mixture with salt, pepper and garlic powder. So far, so good, right? Then it’s time for the go-go juice. Uh, I mean the spinach. Let’s talk about the spinach for a second, shall we? I’m going to give you a really specific measurement to add and that is 2 to 4 large handfuls. Got that? 🙂 It doesn’t matter if you have large hands or small hands, you just want to dig deep in your bag and pull out the biggest handful you can handle and then throw it in the pan. Repeat this until you are satisfied that you have enough giddy-up and go. The thing about spinach though is that it looks likes too much when you throw it in the pan, but then it cooks down to almost nothing. I have huge hands, which a jeweler recently confirmed to me (THANKS BUT NO THANKS WE WILL BUY NO JEWELRY FROM YOU!) so I like to use about 3 handfuls.
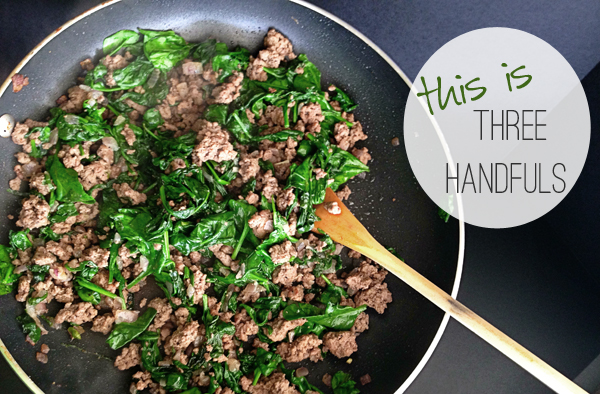
See? Not too bad.
All that goes into a casserole dish, your seasoned eggs get poured over it (Yep, egg seasoning. It’s necessary!) Then you bake, and most importantly YOU EAT! That last part is the best part.

Enjoy it in your breakfast nook or out of a tupperware at your desk at work. Either way it’s a great dish and I hope you enjoy it!
Ground Beef & Spinach Egg Casserole
Cuisine: Breakfast
Author:
Prep time: 20 mins
Cook time: 40 mins
Total time: 1 hour
Serves: 8
Ingredients
-
- 1 Tablespoon Extra Virgin Olive Oil
-
- 1/2 Red Onion, finely diced
-
- 1 Pound Ground Beef
-
- 1 1/4 teaspoons salt, divided
-
- 1 1/4 teaspoons pepper, divided
-
- 1/2 teaspoon garlic powder
-
- 2-4 Large Handfuls Spinach
-
- 1/8 teaspoon nutmeg
- 12 Eggs
Instructions
-
- Preheat oven to 350 degrees and grease a 13×9 casserole dish
-
- Heat Olive Oil over medium in a large skillet. You can also use beef tallow for more flavor and if you want a healthier option.
-
- Saute diced onion until translucent, about 5-7 minutes
-
- Add ground beef and crumble with a wooden spoon and brown until cooked through
-
- Season meat and onion mixture with 3/4 teaspoons of salt and 3/4 teaspoons of pepper and 1/2 teaspoon of garlic powder
-
- Add spinach and let it wilt while stirring into the meat mixture
-
- Sprinkle in 1/8 teaspoon of nutmeg. This gives your spinach a little something extra!
-
- Meanwhile, in a medium bowl crack 12 eggs, season with remaining salt and pepper and scramble with a fork
-
- When spinach is wilted, transfer meat mixture to casserole dish
-
- Pour egg mixture over meat mixture
-
- Cover dish with foil and bake for 30 minutes
- Remove foil and finish baking for 10 minutes or until eggs are cooked to desired doneness
3.1.09
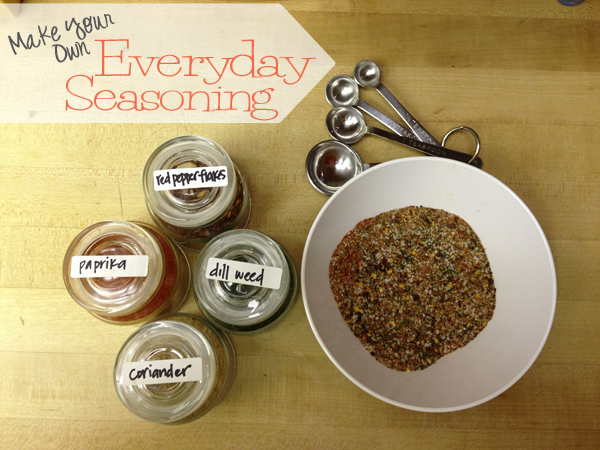
Everday Seasoning
I know it is very hip to be in love with Thomas Keller or David Change right now (and I am not doubting their genius!) but you all, I am still representing my serious Food Network love for Rachael Ray. Hang on while I claim my seat at the unhip foodie table. Alright, now that we’re comfortable…You see the thing is, she taught me to experiment with my cooking and to not fear the kitchen. These are things that absolutely turned me on to cooking, so while I don’t love every single 30 Minute Meal she puts out, she will always have me as a member of her fan club. (Especially now that she makes 6 ingredient dog treats that are the only kind that Buster can eat with barfing! Yay!)
(Talking about dog barf in a recipe post. Pretty sure I’m doing this wrong.)
Anyway, one of the most awesome kitchen short cuts that she taught me was about using grill seasoning for things that you aren’t actually grilling. Mind: Blown, I KNOW! Grill seasoning is generally a pre-mixed group of herbs and spices that really kick up the flavor of any kind of meat and vegetables, and in my kitchen, as well as in grocery stores everywhere, you will often see it labeled as Everyday Seasoning or Montreal Steak Seasoning or perhaps some other branded name that basically means “Sprinkle me on meat and vegetables and I will make them taste good.” And it really is a useful addition to your spice arsenal. I especially love mixing it into burgers as a base seasoning, or rubbing it on chicken or fish when I am feeling no inspiration but don’t want to eat something bland. You may also want to try the Meat spice seasonings.
The only problem comes when you pick up one of these pre-packaged bad boys and the end up being full of preservatives or weird ingredients or things you can’t pronounce. WOMP WOMP! You know what I’m talking about — it is the packaged taco seasoning effect. It’s always a bummer to realize that something that tastes so delicious but is full of so much crap. This becomes especially inconvenient if you are doing a Whole 30 or a really strict nutrition challenge, which is why I wanted to share a super simple recipe for making your own Everyday Seasoning that is completely FREE of garbage, and completely FULL of flavor.
Make Your Own Everday Seasoning
Author:
Prep time:
Total time:
Ingredients
-
- 2 tablespoons paprika
-
- 2 tablespoons crushed black pepper
-
- 2 tablespoons kosher salt
-
- 1 tablespoon granulated garlic
-
- 1 tablespoon granulated onion
-
- 1 tablespoon crushed coriander
-
- 1 tablespoon dill
-
- 1 tablespoon crushed red pepper flakes
- 1 tablespoon of dehydrated onion flakes (optional, for texture)
Instructions
-
- Mix all ingredients together in a bowl
- Rub on chicken or steak, sprinkle on veggies, or mix a TBS or two into your burger mixture for a wonderfully seasoned dinner.
Hope you mix up something delicious!
****For more seasoning inspiration check out What’s In My Spice Cabinet + 4 Delicious Blends You Should Try.
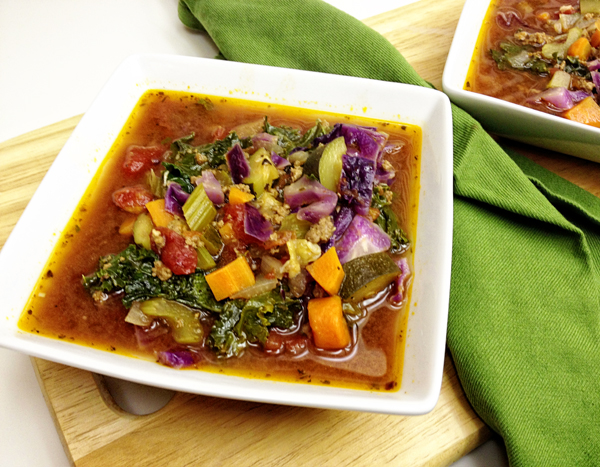
Paleo Minestrone Soup
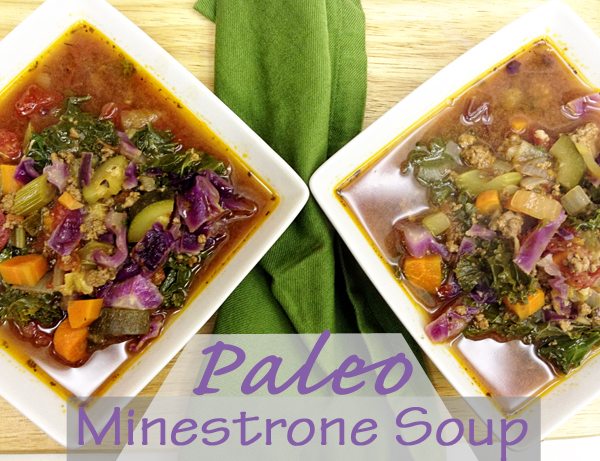
Growing up, one of the best “Comfort Food” dishes my mom made was a big batch of Minestrone Soup. It was meaty, salty, full of pasta and potatoes and there was no better way to serve it than smothered with a ton of Parmesan cheese.
These days I still love comfort food, but my palate has changed and my desire to stuff my face with my mom’s cheesy pasta soup has (on most days) been replaced with a desire to enjoy a nostalgic home-cooked meal while also stuffing my face with some vegetables. This soup is how I combine the two.

I should also note that I can’t actually make this soup without Garrett doing his Eric Ripert “Minestrone!” impersonation at least twice during the preparation. Despite the fact that this soup is very Italian, there was a Top Chef episode many moons ago where Ripert kept saying it OVER AND OVER in his very French accent and so now every time we eat it Garrett acts like he is about to launch into a performance of Les Poissoins. The second thing you should note is that on that same Top Chef episode I think the person who made the Minestrone was eliminated because her carrots were not all the same size. This really offended Tom Colicchio, so you know, KEEP THE CARROTS UNIFORM.
Um, or don’t. This is a rustic soup. That’s the best part, actually. It’s a chop, drop, season, stir and eat kind of soup. And the best part? It tastes EVEN BETTER a day or two after you make it. So make up some on the weekend and eat it for lunch all week. Bonus? It’s Whole 30 compliant! So what are you waiting for?
Paleo Minestrone Soup
Prep time:
Cook time:
Total time:
Serves: 6-8
Ingredients
- 2 Tablespoons Coconut Oil
- 1 Large Yellow Onion, medium dice
- 6 Small Stalks Celery (preferably from the heart, leaves attached), sliced
- 4 Large Carrots, peeled and diced (try to keep them about the same size)
- 2 Medium Zucchini, medium dice
- 1.5 lbs Ground Beef
- 2 teaspoons Salt
- 1 teaspoons Pepper
- 2 teaspoons Italian Seasoning
- 1/2 teaspoon red pepper flakes (optional)
- 3 Garlic Cloves, finely minced
- 3 Tablespoons Tomato Paste
- 2 (14.5 oz) Cans Diced Italian Tomatoes
- 8 Cups Beef Broth
- 4 Cups Red Cabbage (about half a large head) diced bite sized
- 1 Bunch of Kale, stems removed, chopped up
Instructions
- Heat 2 Tablespoons of Coconut Oil in a large heavy bottomed pot (I used a 7.5 Qt Dutch Oven) over medium heat
- Add onions, celery, carrots and saute until translucent and vegetables start to soften (about 10 minutes)
- Add zucchini and saute for 3-5 more minutes and then push veggies to one side of your pot
- Turn heat up to medium high and ground beef in and proceed to crumble and brown
- As beef begins to brown, stir in with all the vegetables
- Add salt, pepper, Italian seasoning and minced garlic and saute for 2 minutes
- Stir in tomato paste and let it melt into other ingredients
- Add diced Italian Tomatoes and beef broth and bring to a boil
- Once boiling, lower heat to medium low and simmer for 30 minutes uncovered
- Add cabbage and kale and simmer for 10 minutes, covered
- Serve and Enjoy!
Pork Shoulder Ragu Over Spaghetti Squash

Braising Season is back, baby! So to celebrate, say hello to your new favorite Sunday dinner.
(It won’t say hi back, by the way, it’s a little shy.)
This is a good meal to make on the weekend because it does take a few hours. Braising meat is definitely not an exercise in instant gratification. But the investment is COMPLETELY worth it, and while it is not 100% “Set it and forget it” there is only minimal tending necessary. Totally manageable on a Sunday afternoon while you lounge on the couch with football on in the background. Your oven will do most of the work, your house will smell amazing all afternoon, and in the end after a stir or two on your part, you will be rewarded with tender caramelized deliciousness that you will want to eat right out of the pot.

But we are civilized, so we will eat it over spaghetti squash!
| Pork Shoulder Ragu Over Spaghetti Squash |
Author:
Prep time: 30 mins
Cook time: 3 hours
Total time: 3 hours 30 mins
Serves: 4-6
Ingredients
- 2.5 lb Pork Shoulder
- 2.5 Tablespoons Salt
- 1.5 Tablespoons Pepper
- 1 Tablespoon Garlic Powder
- 2 Tablespoons Extra Virgin Olive Oil
- 1 Tablespoon Grass Fed Butter
- 1 Cup Red Wine
- 2 14 oz Cans Diced Tomatoes
- 5 Sprigs Fresh Thyme
- 3 teaspoons Dried Oregano
- 1.5 Tablespoons Fennel Seed
- 1 Tablespoon of Hot Sauce (Trader Joe’s Hot Pepper Sauce is awesome!)
- 1 Large Spaghetti Squash
- Handful of chopped fresh parsley
Instructions
- Preheat oven to 325 degrees
- Add Olive Oil and Butter to large dutch oven and heat over medium high until butter is melted but not burning
- Liberally salt, pepper and garlic powder your pork shoulder.
- Add pork roast to pan and brown on all sides (This will take between 10 and 15 minutes to get a good crust going on your roast)
- Add wine to deglaze
- Add tomatoes, thyme, oregano, fennel seeds and hot sauce and bring to a boil
- Cover and put in the oven
- Braise for 3 hours, flipping roast over every hour
- About 30 minutes before your roast is done, prep your spaghetti squash
- Poke 8-10 holes around your raw spaghetti squash
- Put directly into the microwave (I put mine on a paper towel) and nuke for 8 minutes
- Flip Squash over and nuke for another 8-10 minutes depending on how large it is (big boys take longer!)
- When it’s done, remove from microwave (with pot holders it will be HOT!) and let cool for a few minutes
- When it’s cooler, slice down the squash long ways and remove all seeds
- Then run your fork down your squash and pull out your “noodles” into a separate bowl
- Toss squash noodles with a touch of butter, salt, pepper and garlic powder
- Add squash to your serving bowl, top with ragu and chopped fresh parsley and chow down!
It’s homey, comforting and even fit for entertaining should you be so inclined. And if I can make one last suggestion before you head off to procure ingredients, may I suggest serving it with that bottle of wine you opened earlier to cook with?
I mean, no one likes a waster.
